Spider man Drawing easy with this how-to video and step-by-step drawing instructions. Easy drawing tutorial for beginners and kids.
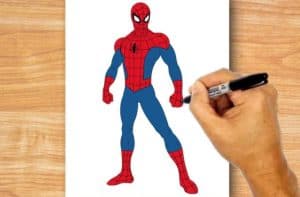
Please see the drawing tutorial in the video below
You can refer to the simple step-by-step drawing guide below
Step 1
First let’s draw a stickman – the man, made up of lines and circles, which we need to represent the basic proportions, posture and position of the hero on a piece of paper. As we all know, Peter Parker is an ordinary person who gained spider abilities after being bitten by a spider in Norman Osborn’s laboratory. Peter has amazing abilities, he can climb over walls, he is endowed with spider-man agility and superhuman reflexes, but his appearance has not changed (except for the it becomes healthier).
In fact, it’s an ordinary person, so first we outline the outline of the head, then the outline of the body.
Step 2
This step may seem massive, but it’s not. First, mark the top with a few vertical and horizontal lines. The vertical line shows the front of the symmetry and the horizontal line shows the position of the eyes. Notice that the vertical line is shifted to the left relative to us.
Next, we sketch the silhouette of Spider-Man, representing parts of his body as simple geometric shapes. Then draw a short neck. Just below, draw the body in a rectangle. In the upper corners of the rectangle draw circles. In the future, these balls will be used to draw delta shapes. Below the shoulders, we draw elongated rectangles of the upper arm, a circle of the elbow and a slightly oblong rectangle of the forearm. Simultaneously sketch the hands.
Under the body draw the groin in the shape of a triangle. From the sides of the triangle are drawn two long cylinders, which serve as guides for the thighs. Note, they taper in the direction from the waist to the knee. Then, draw the knee as a circle and the shin as an oblong cylinder. Outline the foot and move on to the third step.
Step 3
A pretty simple step in the easiest Spider-Man drawing tutorial. Using the markup from the previous step, draw Spider-Man’s face, or rather his mask. It is done in a very simple way. First draw the famous eyes of the Amazing Spider-Man. Note, the eyeliner should be thick on the sides rather than the center of the face. Then circle the outer contours of the head, giving it a finished look. Also don’t forget to delete the instructions.
Step 4
Now erase the extra lines on Spider-Man’s arms and will outline their contours. Perform the same actions with SpiderMan’s body. Pay attention to the arms – the rounded shoulders enter the upper arm, narrow at the elbow area, then widen a bit in the forearm area and narrow at the wrist area.
Step 5
As we all remember, Spider-Man’s costume is made up of two colors – red and blue. So this is the boundary separating these colors, now we have to draw it on the body of our hero. Here we erase the excess lines from the groin area and circle this part of the body.
Step 6
In this step, we remove the extra guides from Spider-Man’s legs. Use very short lines representing the knee joints, then circle all the outer contours. In the area of the lower leg, just above the conditional midpoint of the knee from the ankle, draw outlines of the red and blue parts of the garment.
Step 7
Spider-Man’s figure has been completely sketched, now it’s time to model his costume. First draw vertically, i.e., vertical stripes. They seem to come from an imaginary point between the eyes and disperse throughout the body. Note, these lines should follow the curve of Spider-Man’s body
Step 8
We have finished drawing the horizontal part of the pattern. Note that these lines also come from the center of the condition between Spider-Man’s eyes. At the end of this step and the whole card draw the sign of Spider-Man.
We hope that this drawing lesson was simple for you. In general, it is very simple, except for the first two stages, draw a stickman and apply the rules of building a human figure. In general, in the early stages, regardless of the fact that we are drawing, you must be especially careful, because mistakes made there, will be very difficult to correct. And of course, don’t forget to share this lesson with your friends and subscribe to us on Facebook, Google Plus, Pinterest and other social networks.

![How to draw Zero two [Darling In The Franxx] step by step How to draw Zero two [Darling In The Franxx] step by step](https://htdraw.com/wp-content/uploads/2019/07/zero-two-drawing-step-by-step-Darling-In-The-Franxx-Cute-girl-drawing-370x297.png)
