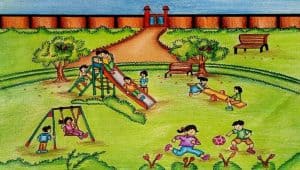
How To Draw A Playground easy with this how-to video and step-by-step drawing instructions. Scenery Drawing tutorial for beginners and kids.

Please see the drawing tutorial in the video below
You can refer to the simple step-by-step drawing guide below
Step 1
Playgrounds are almost always found in the wild and that means they are often surrounded by trees and grass.
For that reason, we are going to start this tutorial on how to draw a playground with some trees at its outline.
For now, we will only draw the outline of these trees, and for now we will leave the base of the trees for more details later.
To draw this row of trees, we will draw multiple shapes facing the air and each will be drawn with a bumpy line.
This bumpy road will make the trees look nice and leafy, and some trees will overlap.
Once these outlines have been drawn, we can continue to add more details in the next steps.
Step 2 – Now draw some details for the tree
Now that you have an outline for these trees in this playground drawing, we can start adding some details to them.
To do this, draw some more bumpy lines similar to the ones you used for the outlines of the trees inside them.
Again, these bumpy lines will help the tree look even and more textured.
We’re still leaving the stump blank for now, but we’ll be filling those gaps soon.
Step 3 – Draw the base for the row of trees
In this third step of the playground drawing tutorial, we’ll draw some bases for the tree line you’re working on.
As we draw these bases, try referencing the reference image to see where the gap will be left. These spaces are there because some playground equipment will poke into the area.
First, use some more bumpy lines to create the base for some of the trees in the row. These stumps will mostly go over the trees on the right side of the image.
Use some wavy lines to draw the ground underneath the trees, and then you can see where to leave some gaps in these lines using the reference image.
Step 4 – Next, start drawing some playground equipment
Every good playground needs some equipment to play with, so we’ll start adding some in this step of your playground drawing. First, we will draw a slide.
The slide has a small section above and then you can use some curves to have the slide go down from there. You can also draw some toys located near the slide such as a ball and a small toy car.
Finally, we’ll end this step by drawing a little rocking horse on the springs on the right hand side of the playing field.
Once this is drawn, this step will be complete and you can move on to the next step where we will finalize the details.
Step 5 – Add the final details to your playground drawing
This step of our playground drawing tutorial will perfect the final details and elements so you are ready for the coloring fun in the next step.
First, use some straight lines to draw a seesaw on the left side. You can then use some more lines to draw a square sandbar to the right.
This sand pit will also have a few toys inside the sand.
Finally, finish using some jagged lines for the grass details on the ground in this playground. After all of this is drawn, you’re ready to move on!
Before you do, make sure to add any details, elements, or ideas that you may have. Here’s your chance to design your perfect playground!
Step 6 – Complete your playground drawing with color
For the final part of your playground drawing, we’ll finish it off with some color. In our reference image, we used a lot of bright colors for the playground equipment as well as for the surroundings.
You can pick up some similar colors in your own drawing, and if you do, there are a few art mediums that will fit nicely into this bright palette.
You can use some colored markers or acrylic paint as a few ideas, but there are so many art mediums you can use!
You should also use any other color scheme that you think works best for it, so what color would you choose for your image? We can’t wait to see it!
Your playground drawing is done!
That brings you to the end of this tutorial on how to draw a playground.
It’s exciting to imagine what your perfectly personalized playground might look like, so we hope it’s fun to imagine what that playground might look like!
Once you have mastered our drawing, remember that you can also add some details and elements of your own.
By adding more equipment, details and color choices, you can personalize this drawing even more. Have fun being creative and see what happens!
Once your painting is complete, you can find more tutorials to enjoy on our website. We have a lot to choose from with more to come soon.


