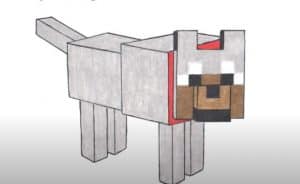
How To Draw A Minecraft Wolf easy with this how-to video and step-by-step drawing instructions. Learn to draw for kids and everyone.

Please see the drawing tutorial in the video below
You can refer to the simple step-by-step drawing guide below
Step 1
As always, we’ll start by creating a guide for the wolf you’re about to draw. It is in the form of a three-dimensional block.
Step 2
Using the shape you just created, start drawing the structure of the head, then the face, and then the muzzle. The ears are the last as they are located only on top of the wolf’s head.
Step 3
You will now draw the face, as well as the mouth and nose lines for the wolf’s muzzle. Draw in the eyes, adding definition liner to the face, ears, and head to give the face and head the same dimension.
Step 4
Almost done, people. All you need to do here is draw the rectangular body followed by the tail.
Step 5
Finally, draw the wolf’s legs, then you’re done after you erase the errors.
Step 6
Now your Minecraft wolf is ready to color. Well done, and remember to show everyone what you’ve done.


