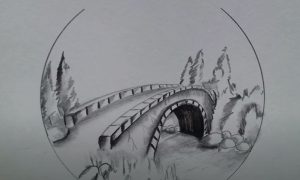
How to Draw A Bridge easy with this how-to video and step-by-step drawing instructions. Pencil drawing tutorials for beginners and everyone.

Please see the drawing tutorial in the video below
You can refer to the simple step-by-step drawing guide below
Step 1
In the first step of the tutorial on how to draw a bridge, we’ll start by drawing the outline of the bridge, which you can add details to later.
For this step you can also use a pencil now as you work on the detailed contours of the bridge.
This sketch may look detailed and complicated, but if you take it slow and do it step by step it will be much easier.
When drawing this bridge, it’s best to work on it as you would a real bridge: from side to side.
You can draw paths and details on the left hand side and slowly work your way up on the right hand side. It will require some patience but it will be well worth it in the end!
Step 2 – Start adding some details to the bridge
You have finished sketching your bridge drawing and now you can start adding some details to it in this step.
The main details that we will add in this step will be some contour details on the top and bottom of the bridge.
For the bricks at the top you can use some straight lines along the top of the bridge, while for the bottom you can draw some round rock shapes.
Step 3 – Now draw some stone details on the side of the bridge
For the third step of the tutorial on how to draw a bridge, we will add some stone details to the sides of the bridge.
This is another step that may require some time and patience, but the end result will be well worth it!
To draw these details, you can use some circles all over the sides of the bridge, and although they will be pretty close together, no one will really touch.
Step 4 – Start adding some details around the bridge
The bridge aspect of your bridge drawing is pretty much done now, so in the last few steps we’ll add some details around it to complete the look around it.
For now, you can draw some small flower shapes on the surrounding bushes and bushes. Then you can draw some line details for the path leading to the bridge.
You can also use some detail like the water going below the bridge to give it some flow.
These are just some of the details you can add, but feel free to add any little details you want to your painting!
Step 5 – Now you can add some final details to your bridge drawing
Before you start coloring your picture, we have some final details to add to this tutorial on how to draw a bridge.
The main detail that we will add will be some jagged lines in the background. They will form spikes representing some of the pine trees in the background.
Shapes like these may look simple, but they go a long way toward developing the scene of your painting.
Before moving on to the final step, you can also add any details of your own that you want!
One idea you can use is to add some weather details to the sky above the bridge. There could be a nice sunny day above it, or there could be a few dark rain clouds above it.
What date do you think it is in your bridge drawing? You can show us the unique details you add!
Step 6 – Finish your bridge drawing with some colors
Now that you’ve finished drawing your bridge, you can finish it off with some pretty colors in this final step!
For our example image, we used some bright and striking colors for the bridge drawing to really make it stand out on the page!
If you want your painting to look similar to this, then there are certain art mediums that will serve you.
Acrylic paints can be great for more vibrant colors, but unless you have a brush with a very fine tip it can make coloring fine details quite difficult.
Instead, you can use some crayons or markers to get the finer details nicely.
Instead, if you want a more discreet look, you can use some watercolor paints.
Watercolor would work well for a painting like this, as it’s a thinner medium so details will show underneath the paint.
These are just a few of the media you can use, so what do you think you’ll use to complete your amazing bridge drawing?
Your bridge drawing is done!
That brings us to the end of this tutorial on how to draw a bridge. We hope that you found this guide helpful, and we hope that it was fun to use, too!
Making a new drawing with lots of detail can be quite intimidating, but when you have some steps to follow, it can become much easier and more fun!
The best part is that you can now paint on this drawing yourself by adding your own details and strokes.


