Girl with beautiful hairstyle Drawing by Pencil with this how-to video and step-by-step drawing instructions. Pencil drawings tutorials for beginners and for All.
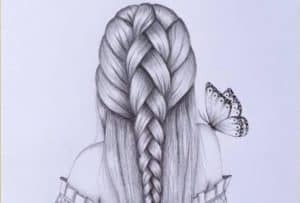
Please see the drawing tutorial in the video below
► Used things :
1. DOMS ( ZOOM ULTIMATE DARK ) Pencil / 2B Pencil
2. Artline love art sketch pencil 8B
3. Double A Offset paper (A4 size)
4. Blending Stump (You can use Paint brush, Tissue Paper or cotton buds instead of this blending stump)
Girl with beautiful hairstyle Drawing Step by Step
Step 1. Start with the Basics:
Begin by drawing the head or face of your character. The shape and size of the head will influence the hairstyle’s proportions.
Step 2. Plan the Style:
Decide on the hairstyle you want to draw. Do you want it to be long and flowing, short and edgy, curly, or straight? Having a clear idea of the style will help you in the next steps.
Step 3. Sketch the Hairline:
Lightly sketch the hairline, taking into account the forehead’s shape. The hairline can be straight, curved, or uneven, depending on your character’s features.
Step 4. Add the Basic Form:
Draw the basic form of the hairstyle. For long hair, you might start with the general shape and volume. For shorter styles, you can define the haircut’s outline.
Step 5. Define Strands and Layers:
Start adding individual strands and layers to give the hairstyle depth and texture. Pay attention to the direction of the hair and how it flows. Consider using reference images to guide you.
Step 6. Create Highlights and Shadows:
Use shading to create highlights and shadows in the hair. Darken areas that would naturally be in shadow, like under layers of hair, and lighten areas where the light hits. This will make the hairstyle look more three-dimensional.
Step 7. Add Details:
Add finer details like wisps of hair, flyaways, or any accessories like hairpins, bows, or clips. These small details can make the hairstyle more interesting.
Step 8. Texture and Texture Lines:
Depending on the hairstyle, you may want to add texture lines to indicate the hair’s texture. For example, curly hair might have more defined texture lines compared to straight hair.
Step 9. Refine and Erase:
Go back over your drawing, refining the details, and erasing any unnecessary lines. Make sure the hairstyle looks clean and polished.
Practice:
Drawing beautiful hairstyles can take practice, so don’t get discouraged if your first attempts don’t turn out as expected. Keep practicing and experimenting with different styles.
Remember that there are countless hairstyles and variations, so don’t be afraid to get creative and come up with your own unique designs. Additionally, studying real-life hairstyles and observing how hair falls and flows in different situations can greatly improve your drawing skills.
hi
hi
That is a Good drawing