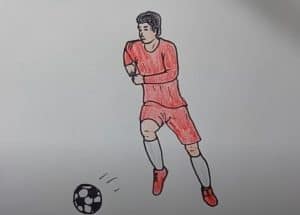
Football Player Drawing Easy with this how-to video and step-by-step drawing instructions. Drawing jobs Tutorial for beginnrs and kids.

Please see the drawing tutorial in the video below
You can refer to the simple step-by-step drawing guide below
Step 1
We will draw a football player in motion. First of all let’s sketch his skeleton, as you can see, it’s very simple. First, outline the head and the lines of the spine. On this line, we put the ribcage and pelvis. With the help of simple lines, we outline the arms and legs. By the way, in the lesson on how to draw a man, we talked in more detail about a man’s proportions.
Step 2
To make it easier to draw the details of the face, we’ll outline two lines on top. Next, outline the contours of the neck and body. With the help of very simple geometries we outline the arms and legs. Note that in this step we draw everything very schematic and use very light lines.
Step 3
A very simple step in which we add the most basic details to our soccer player drawings. We will start from the top and we will move down. Using the intersections from the previous step, outline the eyes, nose, and mouth. Next, draw the contours of the hair, ears, and face. With the help of very light lines we sketch out the clothes and a ball.
Step 4
If you have followed our advice correctly, then you have the basis to draw. Starting with this step, we will detail the drawing using clear and dark lines and fade unnecessary guides. First of all, carefully draw out the contours of the face and hair. Then draw eyes, eyebrows, nose, and mouth.
Step 5
Now we’re going to go down a bit and work on the details of the body. First of all let’s draw the contours of the neck and neck muscles. Next, draw the contours of the neckline and the torso outline. Draw folds in the place of compression and stretching of tissue. At the same time, we remove all unnecessary guidelines.
Step 6
If you’ve drawn your torso, then it’s time to work with your limbs. With the help of smooth and clear lines draw out the contours of the arms, taking into account all the lines of the deltoid, biceps, triceps and biceps muscles under the clothing layer. Also on the clothes we need to draw creases in the armpit and elbow areas. Draw two fists and move next.
Step 7
A rather complicated step in which we will paint the lower body of the soccer player. First draw out the shorts and add the necessary creases to the fabric. Next, draw the contours of the calf muscles and the knee joint. Draw a high-legged line. Eliminate all remaining unnecessary instructions and move on to the last step of the lesson on how to draw a soccer player.
Step 8
So the soccer player drawing is almost complete, and we just need to add some shadows. As in other lessons, the first thing we do is identify the light source. Furthermore, taking this into account, paint lights of different intensities in areas with the least amount of light. In the same step, draw a characteristic pattern on the ball.
If you’ve followed our suggestions correctly, then you now know how to draw a soccer player. Try to draw it in different poses and from different angles, use for this purpose photos of real soccer (soccer) players from the internet and tips from our lessons.


No Responses