How to Draw Sunglasses easy with this how-to video and step-by-step drawing instructions. Simple drawing for kids and Everyone.
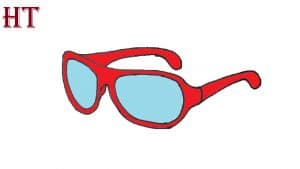
Please see the drawing tutorial in the video below
You can refer to the simple step-by-step drawing guide below
Step 1
To start this tutorial on how to draw sunglasses, we will start with the lens on the left side of the glasses.
To do this, we will draw a rounded triangle for the lens itself. Then, once you have that lens, you can use another curve above it for the frame where the lens is placed.
That’s all there is to do in this step, so let’s move on to step 2!
Step 2 – Draw the rest of the frame for the left lens
Now that you have started drawing the reverse side of the sunglasses, you can complete the frame in this step of the tutorial.
To do this, you will use another curved line to create the bottom part of the glass frame, as shown in the reference image.
That will complete the left part of the sunglasses, and we’ll start with the rest of the sunglasses in the next few steps.
Step 3 – Now draw the right side of the sunglasses
You’ve drawn one side of the shades in this sunglasses tutorial so far, so it’ll be easier to draw the right side!
This side will look quite similar to the lens on the left hand side, but this time the angle will be slightly different.
We won’t draw the top part of the frame yet, but we will be drawing it very soon after we move on.
Step 4 – Next, draw the temples of the glasses
In the fourth step of how to draw sunglasses, you will perfect the frame on the right lens as well as add the temples of the glasses.
First, use some more curves to draw the top of the frame, as you can see in our reference image.
The next part of the glasses that we are going to draw is called the temples, and this is the part that goes over the ears to keep the glasses on your face.
To draw this part of the sunglasses you will draw some lines that will end with some curves at the end.
Step 5 – Now you can finish the rest of the sunglasses
We’ll be adding the details and final elements of the glasses in this fifth step of the how-to-sunglasses tutorial.
Once we’ve added the final piece as well as any additional details of your own, you’re ready to color your drawing in the final step.
First, we will draw the second temple of the glass. Due to the angle, one temple will be slightly more curved than the other.
With that temple, the painting is done! However, before you continue, you can add some details and elements of your own that you may want.
This is one step where you can really unleash your creativity, but we’ll also go over a few ideas you can try.
We covered creating your own design earlier in the tutorial, and you can use what you’ve learned in this tutorial to tweak it and create your own design. If you have a favorite pair of sunglasses, you can try to recreate them in this drawing.
You can also add some accessories to the glass or draw some other objects next to it. If you’re feeling ambitious, you can even paint yourself wearing these sunglasses!
What other ideas can you think of to complete this drawing?
Step 6 – Finish your sunglasses drawing with some colors
In the final step of how to draw sunglasses you will be able to finish it off with some amazing colors!
We used a nice red for the frames of the sunglasses with some shades of blue for the lenses. That’s what we chose for our example, but now you can tell us your favorite color that you think would go well with this drawing.
Sunglasses can come in many different styles and color variations, so this gives you a lot of freedom with how you can color schemes in this photo.
You can also experiment with different art tools and media to help bring color to life. By using mediums like acrylic paints and crayons, you can create pops of color on the page.
On the other hand, mediums like watercolors or crayons can help create a more muted, vintage feel.
Whatever you choose will look great and we can’t wait to see what you can do!
Your sunglasses drawing is done!
With the final details drawn and colors added, you’ve come to the end of this sunglasses drawing tutorial.
We hope that you had a lot of fun making this guide, as we’ve tried to make it as easy as possible for you. The more you can vent frustration from a new drawing, the more you can focus on fun and creativity!
Now you can use what we mentioned in this tutorial and create your own sunglasses designs and works.
By experimenting with different variations, backgrounds, and color choices, you can really create some amazing unique designs.
Once you’ve finished this tutorial, you’re ready for your next drawing challenge! We have many great tutorials for you to enjoy on our website!



No Responses