How to Draw Ballet Shoes Easy with this how-to video and step-by-step drawing instructions. Easy drawing tutorial for beginners and all.

Please see the drawing tutorial in the video below
You can refer to the simple step-by-step drawing guide below
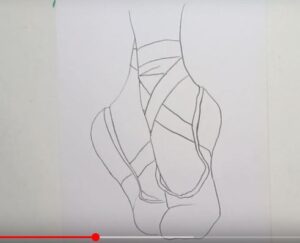
Step 1. Back Foot

Start by sketching the leg and back foot. Use two long curves. Note that the curves usually curve in the same direction. Connect them at the top with a curve and at the bottom with a straight line. Draw a curve on the first foot, outlining the opening of the ballet shoe, adding another line to create its thickness.
Step 2. Other Foot

Sketch the other foot and the front leg. Use a long double curve back on itself, to sketch the top and bottom of the foot. Extend a curve up to form the back of the leg and connect it to the first leg with a curve. Similarly Draw a curve on the first foot, outlining the opening of the ballet shoe, adding another line to create its thickness.
Step 3. Add the Ribbon to the Shoe

Draw a pair of parallel curves on the front leg. Then draw parallel lines above and below them, as if they were going behind them. This shows the ribbons used to create the shoelaces. Draw two sets of parallel curves on the back leg, indicating the ribbons.
Step 4. Finishing the Drawing

You can draw and color your cartoon ballet shoes in ink and color. Or use pencils to lighten the drawing.
You can see more drawings:


