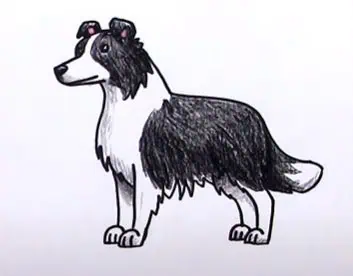
How To Draw A Border Collie easy with this how-to video and step-by-step drawing instructions. Dog drawing for beginners and everyone.
Please see the drawing tutorial in the video below
You can refer to the simple step-by-step drawing guide below
Step 1
The Collie is a short, fluffy dog that is considered one of the smartest dogs alive. To start drawing a line, draw a downward slant to the left and down that curves to create the brows, before curving back to create the top of the muzzle. Curl it back to make the nose and cheekbones, continue a line back to make the mouth and lips. Add a small curve below to make the chin, bend down at the end to make the top of the neck.
Step 2
Add a small curve at the tip of the snout to make the wings of the nose. Fill in a small oval to draw the eyes, and tuck in the ear. Each ear is just two curved lines, one starting at the top of the head, the other starting below and just behind the eyes. One should point up, the other should point down.
Step 3
Now for the chest! The collie has a very fuzzy coat, so create a slightly staggered line, starting at the center of the chin and working down to arching backwards to form the front part of the front legs.
Step 4
The back starts at the right side of the head, drawing a curve that goes back only briefly, before curving towards the rear hump. Then bend it and and out the back. Next, we’ll add fur on the dog’s belly, forming a large drooping mass with a few bumpy lines that can curve up and forward. Then, make a slightly raised incision for the rest of the abdomen, before curving down to make the back of the front leg.
Step 5
In the space between the front and back lines that make up the forefoot, place the paws and patterns found on the leg. This can be done with a starting line above and beyond the chest and front legs, going down to curve forward to make the feet. Then add an oblique line from the top of the first line, going down the back of the paw for the fur pattern. Bring your foot forward to form the other foot, making a small loop for each foot.
Step 6
Draw a small sock shape on the back of the fur block near the bottom right of the Collie. The bottom of the sock should have a slight curve to imply the toes.
Step 7
The next foot should be placed in front of the hind leg, as a simple long oval, slightly curved up on the right side to imply an invisible leg. A small curve should also be at the top of this foot, again to refer to the toes.
Step 8
Collies have large patches of different colors on their bodies. You can stick patches or even pattern strips on your dog’s coat to create your own pattern! To do this though, just add two more lines, one that starts behind the head and ends around mid-chest and the other that starts somewhere near the mid-back and ends just above the front legs.


