How To Draw A Monarch Butterfly easy with this how-to video and step-by-step drawing instructions. Butterfly Drawing tutorial for beginners and everyone.
Please see the drawing tutorial in the video below
You can refer to the simple step-by-step drawing guide below
Step 1
Before we start with the amazing wings of the butterfly, we will focus on the head and body first in the first step of the tutorial on how to draw a monarch butterfly.
To start, you can draw two small circles for the butterfly’s eyes. You can then lengthen these two lines of eyes to create a sense of it. These lines will also have some thickening to the ends of these sensors.
Once you’ve finished this head, we’ll build the butterfly’s body. It will be made up of lots of smaller segments connected together, with the first being a circle roughly the size of the head.
Finally, we’ll connect more similar circles, getting smaller and thinner as they get smaller. Once you’ve drawn the body as shown in our reference image, we’re ready for the next step.
Step 2 – Next, start drawing the wings
Nothing looks like a butterfly without its pretty wings, so we’ll start adding the first one to your monarch butterfly drawing in this second part.
Now we will draw the top half of the wing on the right hand side of the butterfly. To draw this part of the wing, we will use some curves to recreate the shape in the reference image.
There will be some bump on the right edge of the wing, and then it will move inward to form a rather small base that connects to the fuselage.
Step 3 – Draw the next part of the wing
For the third step of the tutorial on how to draw a monarch butterfly, we will basically mirror what you did in the last step.
For this part we will create the top half of the wing on the left side of the butterfly, and it will have a very similar shape to the first part that you drew in step 2.
Once these two halves are drawn, we’ll be ready for the bottom halves of the wings in the next step!
Step 4 – Now draw the bottom half of the wings
This part of your monarch butterfly drawing will see you draw the bottom two parts of the wings.
These sections will have a very different shape from the top half you drew, as they will be rounder and more square than those parts.
They will extend down from the base of the upper half of the wing and are drawn with some circular lines with bumpy edges on the sides.
Once you’ve completed the wing outlines, you’ll be ready to start decorating them in the next step!
Step 5 – Finalize the wing patterns for your monarch butterfly drawing
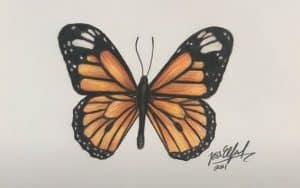
We’ve talked a few times in this tutorial on how to draw a monarch butterfly about how beautiful their wing patterns are, and we’ll start drawing them in this section.
This can be the hardest part of the tutorial, as the pattern can be quite complex. We’ll take it slow and we’ll also be closely monitoring the reference image to ensure no disappointments!
The pattern for the wings will be quite thick at the edges, with some thinner and more intricate lines extending all the way to the inside of the wing.
There will also be some white dot shapes on some of the thicker edges of the black outlines.
Once you’ve copied the pattern as it appears in the reference image, you’re ready for the final step!
Before continuing, you can also create your own unique wing pattern once you have it ready, and you can also paint a great background for your monarch butterfly drawing. We look forward to seeing how you accomplish this!
Step 6 – Finish your monarch butterfly drawing with some colors
This particular butterfly is famous for its distinctive brown and yellow color scheme, and that’s what we found in our reference image.
You can use this same palette for your own monarch butterfly painting, but here’s where you can get creative with your color choices, too! You can make your own unique butterfly variation with some bold and unique color choices or create a more realistic look.
This type of image will work really well with some paint medium like watercolor or acrylic paint, but whatever you use will look amazing!
