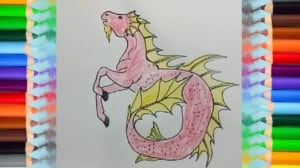
How to Draw a Hippocampus, draw an ancient mythical creature with this how-to video and step-by-step drawing instructions.

Please see the drawing tutorial in the video below
You can refer to the simple step-by-step drawing guide below
Step 1
In step one, what you will do is draw out the instructions and the circle of the hippocampus. Starting from the far left draw a circle for the head. Then draw a square shape for the front body. After you get the drawn shape draw the instructions for the tail, fore legs, and fringe edges for the mane.
Step 2
In this step, what you will do is draw out the shape of the body and the tail of the hippocampuses. Draw on the face by sketching in the eyes, nostrils, lining and the lines in the ear. You will also detail and shape the forelimbs by adding definitions such as muscle and body definition. When your sketch looks like the image above, skip to step 3.
Step 3
Now here in step 3, as you can see you will sketch the details on the mane looking on the hippocampus. Outline of a beard hanging on a horse’s chin face. Make sure you spend your time detailing the fins such as the mane, it must have the appearance of the fins, and make sure the fins go all the way down to the rear near the tail end. Outline the structure on the front leg and outline the tail on the back of the foot. After you have completed all the work needed in this step, delete all the rules and circles you drew in step 1. before proceeding to step 4.
Step 4
And whala, this is what your hippocampus will look like when you are completely done with your drawings. All that is left to do is the color in your Greek mythology to create any color you want. Yeah that’s it. This concludes this tutorial on how to draw a hippocampus. -note- If you color your art in Photoshop, see below and see two additional steps that give you helpful tips on how to color your image.
Step 5
This helpful tip shows you a good way of making fish scales look. The best way to read this tip is to enlarge the image and start reading. Once you’re done, scroll down and read the next section.
Step 6
And here is the final tip I give you and that’s how to create a scatter effect using Photoshop’s coloring tools. Just like the first tip, click on the image to zoom in and read the full detail tips to make coloring Photoshop a lot easier. I hope these tips are helpful to you and remember the artist always has the best imagination.
You are curious and want to draw a cool dragon? Please refer to How to draw a Dragon


