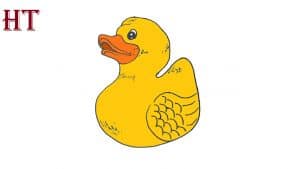
How To Draw A Rubber Duck easy with this how-to video and step-by-step drawing instructions. Simple drawing for kids and everyone.
Please see the drawing tutorial in the video below
You can refer to the simple step-by-step drawing guide below
Step 1
In the first step of our tutorial on how to draw a rubber duck, we’ll literally take it from scratch! This first step will see you draw the head of the rubber duck.
Possibly the most difficult part of this drawing will be the beak, as ducks have a rather specific and intricate design for their beaks.
When drawing the beak for this beak, try to follow the reference image as closely as possible to depict the details. You can also simplify the mine a bit if you have trouble with it!
Then use some curved lines for the round head of the duck and then finish with some ovals for the eyes. Then we’ll move on to step 2!
Step 2 – Now draw the front of the neck and chest
To continue drawing this rubber duck, we will now add the front of the neck and chest.
Rubber ducks tend to have a very wavy shape to them, and this will be obvious when you look at our example image.
This line will extend from below the beak and go down in a very curved fashion. Once you’ve added this, go to step 3.
Step 3 – Draw the tail and outline of the wings
We will now add the outline of the duck’s tail and pointed wings in this third step of the how to draw a rubber duck tutorial.
The duck’s tail will be relatively high and pointed, and it will extend to the rubber duck’s back and rounded legs.
Near the base, we will use some connecting curves. They will be drawn like this to create the look of the feathery end of the duck’s wings.
That’s all that needs to be done for this step, so when you’re happy with how it looks, we’ll continue adding this duck in the fourth step.
Step 4 – Next, draw more wings
We added the outline for the wings of this rubber duck drawing in the previous step, and in this step we will add some interior details.
The inner contour of the wing will be drawn with more curves, as shown in the reference image.
Then for some more feather detail you can start adding some smaller curves close together.
These feather details will mostly go near the tips of the wings, but we’ll add more along with some final touches in the next step.
Step 5 – Add the final details to your rubber duck drawing
All the sketches are done, and in this fifth step of the how to draw a rubber duck tutorial we will focus on adding some smaller details.
We added some simple curves all over the rubber duck’s body and head to create some texture.
Then on the wings we add a bunch of smaller circles to create a feathery texture.
These are the final details we chose for this picture, but you can add more details too! Another idea is to draw the background.
You can choose a typical setting such as letting it float in the bathtub, but there are other cool settings you can make!
This is your chance to get creative, so what will you do to finish this cute image?
Step 6 – Finish your rubber duck drawing with color
Traditionally, rubber ducks are bright yellow with a vibrant orange color to the beak.
This is what we looked for in our reference image for this rubber duck drawing. For the body and head of the duck, we used different shades of bright yellow.
By combining lighter tones and striking whites, you can create a more shiny texture for the duck.
While this is the traditional look of rubber ducks, they can come in just about any other color you can imagine!
When you finish this image, you have a lot of freedom with how you can color it. Get creative with your favorite colors and art mediums and see what happens!
Your rubber duck drawing is done!
Go to the end of this rubber duck drawing tutorial! We hope you had a great time as you recreate this adorable rubber duck with us.
In this tutorial, we wanted to make drawing this design easy and fun, so as long as you follow all the steps we’ve given you’re good to go!
Completing this tutorial is just the beginning, as you can continue the fun by creating your own rubber duck designs using the steps you took in this tutorial.
You can also add elements like backgrounds or creative colors, so let your creativity run wild!
When you finish this tutorial, you may find more fun drawing on our website! We have lots of great tutorials for sampling and the list continues to grow as we keep adding more.
Keep subscribing to make sure you never miss any new tutorials!
You’ll be amazed to see your finished rubber duck drawing, so be sure to share it on our Facebook and Pinterest pages for us to see!
No Responses