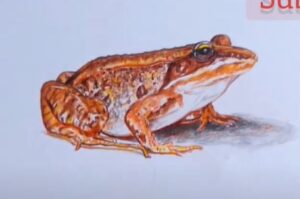
How to Draw a Wood Frog with this how-to video and step by step drawing instructions. Draw along with these clear 9 drawing steps. You will learn the fundamentals for drawing a wood frog.

Please see Wood Frog drawing tutorial in the video below
You can refer to Wood Frog simple step by step drawing guide below
Step 1. Draw the upper eyelid
Create the frog’s bumpy upper eyelid by drawing two curved lines.
Step 2. Add eyes
Add the visible eye by drawing a circle. Create an oval inside the eye to form the pupil.
Step 3. Draw the nostrils
Draw a small dot to add its nostrils.
Step 4. Sketch the body
Now, sketch the wood frog’s oval body shape as shown.
Step 5. Add front legs
Shape the frog’s long front legs attached to its body as shown. Don’t forget to erase the body parts that overlap the front legs!
Step 6. Attach the back legs
Now, draw the shape of the wood frog’s folded hind legs similar to the illustration. Make sure to remove any body parts that overlap the back legs!
Step 7. Draw the robber mask
Wood frogs have a distinctive pattern on their face called a bandit mask. Create this pattern by drawing a shape on its face that covers its eyes and nostrils. Then, draw a wavy horizontal line along the edge of its body as shown.
Step 8. Sketch the lower abdomen
Then, outline the wood frog’s abdomen by drawing a curved line near the bottom of its body.
Step 9. Complete the wooden frog drawing
Let’s complete our wooden frog drawing! First, color the eyes with yellow and black crayons. Next, color the bandit mask with a dark brown pencil. Now, color its belly with cream colored pens. Then, shade the rest of the amphibian’s body with a dark blue pencil.


