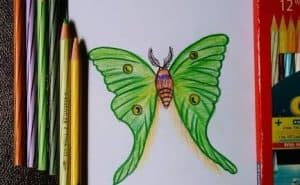
How to draw a Butterfly (Luna Moth) easy with this how-to video and step-by-step drawing instructions. Insect drawing tutorial for beginners and everyone.

Please see the drawing tutorial in the video below
You can refer to the simple step-by-step drawing guide below
Step 1
Like any moth, there are many intricate details and structures to be found with this particular insect.
For that reason, we have broken the drawing into smaller steps in this tutorial on how to draw a luna moth.
This will make it easy to conquer any intricate elements and details you may encounter!
First, we’ll start with the central part of this luna moth. To do this, you can use some small curves and circles for the moth’s head.
This will include the insect senses and they will be drawn as some curved, pointed shapes.
Then we will draw the top of the wings. To do this, simply extend some slightly curved lines horizontally from the base of the head.
With this drawing, we’re going to aim for symmetry, so try our best to have them the same length and angle.
Step 2 – Now, draw the body of the moth
The body of this moth is relatively small, and we will outline the body in this step of your luna moth drawing.
First, extend two short and curved lines down from the top. This will form a squared shape below that first part and there will be a gap at the bottom of it.
Next some curves create a rounded section below it, and then we’ll draw the belly.
The bottom part of the body is made up of a rounded outline that has short lines along it to form sections. Then you’ll be ready for step 3 of the tutorial!
Step 3 – Draw the top of the wing decoration
This third step of our on how to draw a luna moth is where things can get a little complicated!
That’s because we’ll start working with the decorative elements of the wings, and this is the most complicated part of the moth.
However, as long as you keep a close eye on our reference image you should have no problem with it!
First, use some curved lines to create the bottom edge of the top part of the wing. Then we’ll use some curves and circles for the pattern on the wings.
This is another step where it’s best to make it look as symmetrical as possible. If you have any trouble with it, copying our reference image is the best way to make it easier!
Step 4 – Next, add the rest of the wing outline
We will now finalize the rest of the wing outline before starting the final details of this luna moth drawing.
First, draw the bottom edges of the wings using some wavy lines. Then we’ll add the long, thin tail sections of the wings that will follow the moth.
Once the outlines are complete, you can also add some finer details. Once you’ve completed these details, we’ll be ready for the final details and elements in the next step of the tutorial!
Step 5 – Add the final details to your luna moth drawing
We just need a few more details before we get to the final step of the luna moth tutorial!
These details are mostly contained in the patterns on the wings, and you can complete this with some simple shapes and curves all over the wing.
Once these are complete, you can also add any of your own! They may include the background or may even add some insects. How would you complete this beautiful picture?
Step 6 – Finish your luna moth drawing with color
This is the final step of this luna moth drawing, and in it we will finish with some color.
This particular moth is famous for its beautiful soft colors and this is what we did in our example image.
This moth is most famous for its lime green color, and while we used this color, we also included some light blue for a few varieties.
Would you choose these classic colors or maybe change it up to create your own unique moth? We also thought the paint color would be perfect for this image, but whatever medium you choose will look amazing!
Your Luna Moth drawing is done!
Drawing insects with such intricate patterns is not always an easy task, but we hope that this luna moth drawing tutorial makes it easy and fun!
When dealing with a complex drawing like this, it’s a lot easier on your own when breaking it down into smaller steps and that’s what we want to do for you.
Now you can take over with your own fun elements and additions! There’s a lot you can do to spice up this image and we can’t wait to see what you choose to do.
There is also more fun when you visit our website! We have lots of great tutorials waiting for you and we will upload new ones soon.


