How To Draw The White House easy with this how-to video and step-by-step drawing instructions. Pencil drawing tutorials for beginners and all.
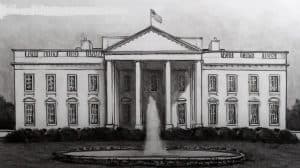
Please see the drawing tutorial in the video below
You can refer to the simple step-by-step drawing guide below
Step 1
The first step of our White House tutorial you will see starts at the center of the front of the building.
More specifically, we will draw the top part of the central structure. This structure will be rounded and curved with some small square turret structures integrated within it.
Add another curved section below this, and then when you have it looking like our reference image, you’ll be ready for the next step of the tutorial.
Step 2 – Now draw some more central parts
The second step of this White House drawing may look complicated, but it’s not too difficult!
We will extend the center section down and this will mainly consist of some thin and long pillars. Carefully draw these thin pillars and add some details at the top and bottom of each.
There will also be some details between each pillar, so you can draw them before moving on to step 3 of this tutorial.
Step 3 – Draw the final details of the center part
Before we move on to the different parts of the building, we’ll wrap up the center part in this third step of our tutorial on how to draw the White House.
To do this, we’ll first add some small, curved stairs on either side of the base for this center piece. Then we’ll draw some small doorways with wall lanterns between them.
That will end this center section and in the next section we will add more structure.
Step 4 – Next, draw the left side of the White House
The part we’ll be drawing in this fourth part of the White House tutorial is another section that looks complicated but doesn’t have to be!
This will be the left part of the structure and it has a rather rectangular design.
There are also several slim pillars incorporated into the design of this section, and there will also be some ornate window designs between them.
This is a step that you should try to take slowly while closely following our example. Then you’ll be ready for some final touches in the next step of the tutorial!
Step 5 – Add the final details to your White House drawing
This fifth step of ours in how to draw the White House will help you perfect the final elements and details before you add some color to it in the final step.
First, you can mirror what you drew in the previous step by drawing the right half of the building.
The details look identical to the left side, so try your best to make it as symmetrical as possible!
Then we will also draw some bushes at the base of the White House and you can create these using some bumpy lines.
Finally, it wouldn’t be an appropriate representation of the White House without the US flag, so you could add a proud flyover above the building.
Before moving on to the final step, you can also add some highlights! One idea would be to paint a patriot-style background behind the building. What kind of background can you think of to add?
Step 6 – Finish your White House drawing with color
Due to the name of this building, you might think that you will be limited with the colors you can use when coloring it.
In the final step of your White House drawing, we’ll show you that there are ways to get creative with color even with a predominantly white house!
When coloring the building, you’ll notice that we didn’t leave it completely white. Instead, we used several shades of light gray for the building to create a slightly more dynamic look.
Then we used some yellow for the window to make it look like the lights inside. It also helps to add some warmer colors to the image.
We then ended up with some bright green for the trees at the base and of course adding some red and blue for the US flag flying above the White House.
How do you think you would complete this amazing drawing of the White House?
Your White House drawing is done!
This is possibly the most famous house in the world and we hope that you had a great time creating a great picture of it during this White House drawing tutorial!
There’s a lot of detail to understand in this description, so we wanted to make it much easier for you by breaking it down into smaller, more manageable steps.
Now that you’ve completed all of our steps, you can show us how creative you can be by completing this image.
We’ve already shown you a few ways that you can do it, but there’s no limit to the creativity you can use to take this photo even further!
There’s more good news coming your way, because competing for this picture isn’t the end of your drawing fun!


No Responses