How to Draw an Anime Elf Girl easy with this how-to video and step-by-step drawing instructions. Anime girl drawing tutorial for beginners and kids.
Please see the drawing tutorial in the video below
You can refer to the simple step-by-step drawing guide below
Step 1 – Draw Center & Top Guides
Start by creating a vertical line through the center of your drawing area. This line can help you see if both halves are equal in width.
Next, draw a circle that will represent the top of the head.
Step 2 – Draw the lower part of the head
Going down from the circle draw the bottom part of the head. As illustrated in the example above, the bottom part should start with a pair of lines then curve into another pair finally joining a small curved line to form the chin.
Step 3 – Draw Neck & Shoulders
From the bottom part of the face, draw lines for the neck going down to the shoulders. Adding a bit of shoulder will make the drawing look more like a realistic portrait instead of just a “floating” head.
Step 4 – Positioning & Drawing Eyes
To place the eyes, first divide the face in half with a horizontal line. This line can also help you make sure that both eyes are at the same level.
In this case, the eyes will be quite narrow, so draw them a little below the line.
For this first example, draw the eyes with their inner ends slightly downward (towards the nose).
For now, let’s ignore the smaller details like eyelashes, pupils, and reflections. They will be added in a later step.
Horizontal eye spacing
The distance between the eyes is far enough that you can fit another eye between them.
Different types of eyes
Depending on the type of character you want to have, you can draw another variation of the eyes as shown above. This can especially be for a more “moderate” personality.
For this set of eyes, draw them with their outer ends (towards the sides of the face) facing down.
Step 5 – Positioning & Drawing Eyebrows
A little distance above the eyes to draw the eyebrows. For this set of eyes, draw the eyebrows downward towards the nose (same as eyes).
Different types of eyebrows
If you chose the second type of eye in the previous step, you can draw your eyebrows slightly up and angled in a different way.
Step 6 – Positioning & Drawing Nose
Draw the nose pretty much with just a small vertical dot or dash. For this particular face, position the nose slightly higher than halfway between the lines used to place the eyes and the bottom of the chin.
Step 7 – Positioning & Drawing the Mouth
The lower lip of the mouth (not actually drawn) should be about halfway between the bottom of the nose and the bottom of the chin. You can draw the real mouth slightly above that point.
In this case, the character will smile slightly so you can draw the mouth a bit more lonely and curved than it is in its natural state.
Step 8 – Positioning & Drawing Elf’s Ears
Drawing elves’ ears can sometimes be just a stylistic decision, but other times they can also help emphasize the character’s personality. For example, an upward facing ear could mean a more “optimistic” personality. On the other hand, drooping pointed ears may be due to characters having a more temperate or shy personality.
One possible explanation for this is that animals tend to raise their ears when on alert/watch and lower when scared. This is something that most people know and are used to. As a result, drawing anime/manga’s pointed ears in specific ways can help send a visual message about the character they’re assigned to.
You can use the first two pairs in the example for the normal/optimistic face and the last pair for the gentle/shy face.
Draw protruding ears
Although the base of your ears is often hidden behind your hair, you should know how to place them on top of your head when you want to show it off and avoid mistakes.
For this first set of ears, you can draw them with their tips raised quite high (over the eyebrows).
In general, you can place the base of the ears with the bottom level with the bottom of the nose or slightly lower. The head may be located around the top of the eye.
Since this is a stylized and imaginary character, ear placement doesn’t matter much but if you’re not careful your drawing can look weird.
For some common drawing mistakes and tips to avoid them, see:
Common mistakes when drawing Anime & Manga
Drawing Medium Raised Ears
As an alternative to the previous example, you can draw the ears with their ends slightly lowered.
Position the base of these ears the same way as in the previous example. You can also do this for the next two sets.
Drawing Ears Lowered Medium
You can draw the ears with their tails lower and combine them with the second set of eyes from step four for a “gentle personality” look.
Draw lowered ears
Finally, you can draw the ears “inverted” where they curve in the opposite direction and hang pretty far down.
Step 9 – Draw the hair
When drawing the hair, you can think of it as divided into front, sides, and back sections as shown below.
For a more detailed explanation of this as well as examples of other hairstyles see:
How to draw Anime and Manga hair – Female
Draw the front part of the hair
For this particular hairstyle, start with the front section as shown above. There will be a little bun in the middle with the rest of the hair swept to each side.
Draw the side parts of the hair
For the “front hair” add two sides. In general, hair this length will tend to “hug” to the head/face so draw each side with a slight curve.
Draw the back of the hair
Finally add the back / top section as shown above.
Step 10 – Add small details of facial features
To complete the line drawing, add all the smaller details.
These include the following:
Hints of eyelids (between eyebrows and eyes)
Eyelash
Draw eye details
You can see the step-by-step details of how to draw eyes above.
If you want to stop at drawing a straight line, you should still add a little shading to the eyes (as shown in the example). If you’re going to switch to a fill then you can add color instead of gray.
For a detailed explanation of how to draw anime eyes, see:
How to draw eyes for girls in anime
Once you’ve finished adding the small details (if you’re drawing with a pencil and creating light lines as suggested at the beginning of the tutorial), you can now trace your drawing with a single stroke. darker. Alternatively, you can also use a black pen or marker, just be careful not to make a mistake.
Alternative face details
Above, you can also see what an alternate version of this character with slightly different set of ears/facial features might look like.
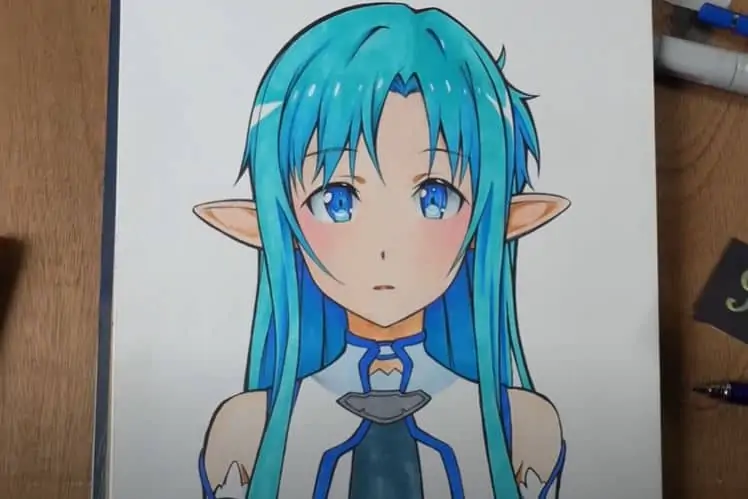
Step 11 – Apply Color
This particular character will only use two primary colors. One for skin and one for hair, eyebrows and eyes.
Green is a pretty popular anime hair color. It can also be a good choice for a leprechaun as they are often associated with forests and nature.
Please note that if you are coloring on paper, you can leave the highlights white (see last step of the tutorial) and color around them. If you are coloring digitally, you can add them on top of the hair color. You can also add them with white pens or white paint.
Dark Elf . Color Variations
In addition, you can also turn the character into a dark elf by changing the color similar to the example above.


