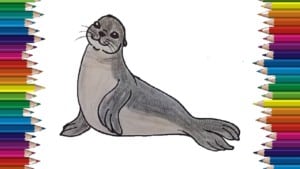
How To Draw A Seal with this how-to video and step-by-step drawing instructions. Easy animals to draw for kids and everyone.

Please see the drawing tutorial in the video below
You can refer to the simple step-by-step drawing guide below
Step 1
Draw an oval head shape, leaving an open space for the body
Step 2
Use a curve like the letter “W” for the mouth but it is not really perfect, a small circle for the nose, and two dots for the eyes above the corners. On the edge to add the mustache.
Step 3
Draw the body using two curves that continue from the top and the bottom.
Step 4
Draw the front leg starting from inside the body of the seal, using the two curves on the left and are connected by a vertical line. On this line add some small triangles. Then draw the rest of the lower part of the body.
Step 5
The previous leg cast uses two lines to meet at the rough edges starting at the right side of the body.
Step 6
Draw the hind legs continue from the body, there are two lines meet at a curve with some lines coming from the end.
Step 7
Draw another hind leg before a part of the hind leg first (so you may need to delete some duplicates). Other than that would be essentially the same, and add the line at the end.
Step 8
Complete the seal by coloring it so it looks more realistic.


