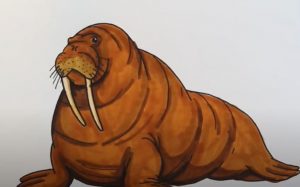
How to draw a Realistic Walrus easy with this how-to video and step-by-step drawing instructions. Easy animls to draw for beginners and everyone.

Please see the drawing tutorial in the video below
You can refer to the simple step-by-step drawing guide below
Step 1
We will start this tutorial on how to draw a walrus with the most recognizable part of the animal!
This means we will draw the head and large tusks of the walrus, and you can start by using a curved line for the top of the head.
The body of the walrus will generally be rather grainy and wrinkled, and we will draw this effect using several interconnected curves.
Apply this effect to the back and front of the neck, then paint some details on the face like the eyes, nose and beard.
Finish using some long curved lines with a pointed end for the tusks, and then move on to step 2!
Step 2 – Now draw the back of the walrus
With the head complete, we can now draw the back of this walrus! Like the neck, we’ll draw the back using some wavy, curved lines to create the wrinkled look we’re aiming for.
The back will tilt down a bit, and you can also draw the top of the thighs for the back using some curved lines.
Once the back is drawn, we’re ready to go to step 3 of the tutorial!
Step 3 – Draw the first flipper for the walrus
This big animal wouldn’t do well in the water without some flippers to propel it away, so we better add some in this third step of our how to draw a walrus tutorial!
The front flip sheet will be drawn using the same curvilinear method you are using and it will have a thick top resulting in the end of the flip sheet extending out at a right angle.
The back will be flat to the ground and facing the back, and it will attach directly to the hip part you drew in the previous step.
Step 4 – Next, draw the chest of the walrus
Continuing with this walrus drawing, you will add the last part of the body in this step. This will be the animal’s chest, and it will be pretty wrinkled like the rest of the body.
Simply use some more curves connected together as shown in the reference image, then add some more lines extending inside the bust.
This will help this last part of the body look consistent with the rest of the body you drew.
Once this part is done, we will move on to the next section to perfect the final aspects and details of this picture!
Step 5 – Add the final details to your walrus drawing
Before you move on to the final step of this tutorial on how to draw a walrus, we only have one more element to add along with some final details! The main thing to add would be the last flipper.
This one will go to the right, and it’s still as straight as the first one. Aside from the smaller position, angle, and perspective, it should look pretty similar to the other flippers you’ve drawn.
Once you’ve finished drawing, you can add some details and ideas of your own!
They can include a fun background or even some other sea animals to go with this walrus. What kind of settings and other animals can you think of to complete the shot?
Step 6 – Complete your walrus drawing with color
This is the final step of this walrus painting, and in it you can finish by coloring your work! Our reference image shows you one of the ways you can color your walrus.
We used various shades of brown all over the body to give it a more realistic look. By combining different shades, you can ensure that the skin has more definition.
When coloring your own version, you can create all sorts of amazing colors!
You can use other muted colors for a more realistic version, or you can use brighter, more stylish colors to create a more vibrant picture.
What colors and art medium will you choose to complete this image?
Your walrus drawing is done!
We hope you had a great time doing this tutorial on how to draw a walrus!
Drawing a creature with so much detail like this can be quite a challenge, but we’ve tried to show you how easy it can be when it’s broken down into smaller steps.
Following the steps and doing your best is a surefire way to conquer any drawing challenge!
Now that you can draw this amazing walrus, you can keep the drawing going with your own interesting details and elements.
We talked about some ideas like background painting and some other animals, but now it’s up to you to take over and show off what you can do!
When you’re ready to keep drawing momentum, you can check out our website for more awesome drawing tutorials to enjoy!
We’ve got plenty of options to choose from with more along the way, so keep signing up!
You can then wrap up the process by sharing your finished walrus drawing on our Facebook and Pinterest pages!


