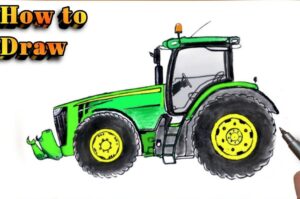
How to Draw a John Deere Tractor with this how-to video and step by step drawing instructions. Easy Farm Drawings tutorial for beginners and all.

Please see John Deere Tractor drawing tutorial in the video below
John Deere Tractor Drawing Step by Step
Step 1. Start by drawing tires
Start by drawing two wavy circles. Next, draw two smaller circles on each tire to sketch the rim and the center. Now, add eight small circles around the centers to form the labels.
Step 2. The next form fender
Next, sketch the curved shape of the fenders above the tire. Then, add short lines connected to the tire.
Step 3. Now draw the body of the tractor
Now, draw the slender body of the tractor. Add two horizontal lines near the top part of the tractor. Then, forming grids by drawing a range of vertical lines.
Step 4. Sketch the taxi
Draw two steam cross bands. After that, form the long roof of the taxi.
Step 5. Attach the exhaust pipe
Attach the curved shape of the exhaust pipe attached to the hood of the tractor.
Step 6. Complete the drawing of the John Deere tractor
Let our drawings complete a John Deere tractor! First, fill in tires and centers as well as exhaust with dark gray pen. Next, color the grille and small lugs on the wheel with light gray pencil. Now, the shade of the taxi window with a light blue pencil. Then, use yellow pencil to color the rim and horizontal strip on the tractor body. Finally, fill in the rest of the body and taxi with the iconic green of John Deere tractor.
You can see more drawings:


