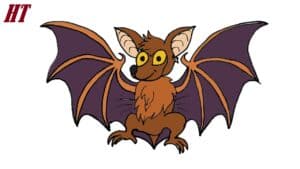
How to Draw a Fruit Bat with this how to video and step by step drawing instructions. Easy animals to draw for beginners and all

Please see Fruit Bat drawing tutorial in the video below
Fruit Bat Drawing Step by Step
Step 1
Let’s start with two simple shapes. One for the head and one for the body. The two figures should be connected like this. Add the face guide, then draw the wingspan guide as well.
Step 2
The next thing you will do is start sketching the head of the fruit bat. On the top of the head there should be some such hair, the ears should be large, and the nose or muzzle should be as long as you see here. Once this is done, pull the lower jaw outward to create the mouth.
Step 3
The first thing we will tackle here is the task of detailing the ears of the fruit bat. Outline the skin tissue like this, then draw some cartilage inside the ear. Next, draw big eyes and color one pupil. Draw the nose like that, then move on to step four.
Step 4
This is a very simple step as all you have to do is sketch some fluff for the bat’s chest. As I said in the description, fruit bats have hairy bodies.
Step 5
Draw the rest of the body, followed by the legs outstretched. Draw the paws with such nails, then move on to step six.
Step 6
Almost done, people. All you have to do is draw the arms and wings. You will need to draw real fingers for the wing like this, then draw the end lining to complete part of the wing.
Step 7
Cut off the rest of the tips on the wings like that, add some detail to the bat wings near the body, then draw a few more toes. You can start erasing mistakes and tutorials.
Step 8
This is what your fruit bat should look like now when you’re done. Color it and show everyone your work. Well done people!


