Please see Hair Buns drawing tutorial in the video below
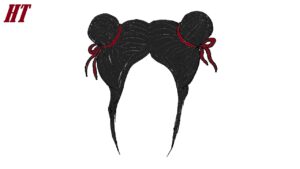
In this lesson, I want to show you how to draw buns. You have seen this hairstyle many times in young girls and women of all ages. This hairstyle is very comfortable and great for long hair.
Divide your hair into two halves and gather your hair into a neat bun on each side. It turns out that a beautiful hairstyle can be done every day. In addition, this hairstyle is suitable for a holiday, you can simply use any additional decorations, such as decorative hairpins or beautiful headbands.
Drawing such a hairstyle is very simple. You can easily cope with this task, even if you have never had to do this before. With this step-by-step tutorial, you’ll quickly and easily draw a bun. In this tutorial, make sure that both sides are symmetrical.
Hair Buns Drawing Step by Step
Step 1. Add the top border of the front strands.
To do this, you need to draw a long circle.
Step 2. Draw the outline of the hair above the forehead.
Identify the center of the forehead and draw two lines from this point.
Step 3. Describe the outline of the head.
With the help of smooth lines, draw the outline of the head at the top and sides.
Step 4. Add a bun on one side.
Sketch a small circle on the left.how to draw a simple bun
Step 5. Braid the bun on the other side.
Repeat the previous step and draw the same circle on the right.
Step 6. Detail the bun.
Draw fine lines along each bun to describe the texture of the hair.
Step 7. Add details.
Draw smooth lines in the direction from the center of the head to the buns.
Step 8. Add details.
Detail the hair above the forehead.
Step 9. Color the bun.
Use orange or any other shade of your choice.


