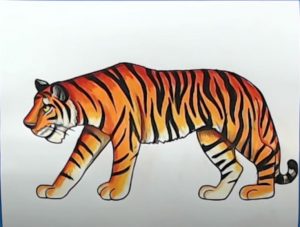
Tiger Drawing easy with this how-to video and step-by-step drawing instructions. Wild animals drawing for beginners and everyone.

Please see the drawing tutorial in the video below
You can refer to the simple step-by-step drawing guide below
Step 1:
In this tutorial we will draw a tiger face outline and a nose. First, we draw a curve in the center of the page and methodically shape the forehead and nose. We will also add the outline of the tiger’s fangs. We are now done with our first step.
Step 2:
In this tutorial we will draw the ears and whiskers of a tiger. First, we draw the tiger’s ears. Next, draw a semicircle on top of the tiger’s head. Now we draw another ear below the title. Finally, we will draw the beard of a tiger. Draw a simple curve below the nose and create a whisker shape. Now we are done with the second step.
Step 3:
In this step we will draw an outline of the whole body, tail, eyes and legs:
We will draw a simple small line to create the shape of the eye, and then we create a striped outline.
Draw a curve from the top and move to the pencil on the right side. Now we will draw the tail.
Draw a u shape with a simple string and make the tail of the tiger.
Finally, we are making the legs of the tiger. Select the line from the tail and drag it to the bottom page. Finally, we draw a simple curved line to create the shape of the leg. Now we are done with the third step.
Step 4:
In this step we will draw the legs in front and below the edge of the body. First, we will draw the legs. Draw a simple curved line and drag it to the side leg. Now we draw a simple line to create the shape of the lower side body. Finally, we will draw the front leg. Draw two simple lines and connect each line. We are now done with the fourth step.
Step 5:
In this step, we will draw the design of the tiger skin randomly. Now start the simple curve to create the tiger skin design. This step is not the final drawing. You can draw this line as you think. It depends on you how to draw a tiger body design. We are now done with our fifth step. Learn more about how to draw a different tiger.
Step 6:
In this step, we will fill in the bold color that we made in the previous step. Then dark color of the given shape made in the previous step. Make sure everyone serves in the dark. We are now done with the sixth step.
Step 7:
In the last step, we will color pencil the whole body. Now we’re creating a pencil shadow for the entire body, although our drawing looks good. We’ve done our last step.
Now we have finished drawing the tiger with a pencil sketch. It has been effort to draw. I hope you enjoyed this tutorial and learned a lot. Now you can see that our drawing looks like a realistic drawing of the tiger. Don’t let yourself down. Be confident and start your drawing work. I’m pretty sure you can do that. Great drawing idea is to provide various categories to draw many things. You can learn many drawing with pencil sketch, drawing for kids, drawing tutorials for beginners and creative drawing. So go ahead and start practicing to make yourself perfect.


No Responses