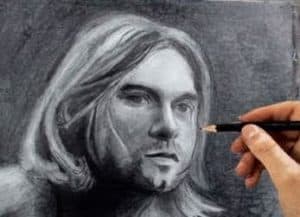
How to Draw Kurt Cobain by pencil with this how-to video and step-by-step drawing instructions. Celebrity drawings for beginners and everyone.

Please see the drawing tutorial in the video below
You can refer to the simple step-by-step drawing guide below
Step 1
Start with your oval the same way in this picture in the frame. Draw gently with a #2 pencil, not a hard numbered pencil. Stay close to the shape because it’s not a perfect “upside down” egg shape.
Step 2
Draw the bisector to help Kurt have symmetrical features.
Step 3
Now lightly draw the crescent lines.
Step 4
Lines a. through d. are great guides for: a. eyebrows, b. eyes, c. nose, and last but not least, d. the mouth.
Step 5
Now draw in the eyes and nose.
Step 6
Looks like Kurt is shaping up more. You can now position your eyebrows. The left eyebrow, facing us, will be shaded. Positions help you note the location of his features. Continue to outline lightly in nostrils & bottom of nose, lips, chin definition and neck position.
Step 7
This painting reminds me of “Paint by Numbers.” Don’t panic about how many lines to add. Relax and get into the rhythm of drawing. It’s therapeutic. You do not need to hurry. Try to take time out of your schedule to do this sketch so you don’t feel pressured. Take a close look at his hair and see where these lines lie in relation to the crescent and face, and draw the hairs like feathers. Cover his eyebrows and eyes. (He put on eye makeup – don’t be shy!) Observe the contours of his beard and follow that. It will be the base for hair studs or dandruff. To the right of where his neck needs to be erased, draw lines for his turtleneck. Now you can finish your shoulders and lapels. Great job! Erase and sketch as much as you want as each line draws you closer to precision.
Step 8
You can delete and/or mix your guidelines. This is an outline by Kurt Cobain. If you want to go the extra mile, there are many meaningful treats in the store.
Step 9
This is where your skills will come into play. And if you’re brand new to shading like this, you’ll find your photo has more depth. I left the right lapel uncovered to show the velvet lines of his jacket. That is laying the foundation for the texture of this jacket. Also pay attention to the left and bottom lapels – I left that as well.
Step 10
In this picture you can see more shadows on the lapel areas. Even now the jacket is being conceived to look more real. Also, I shaded with my Monolith Graphite pencil. Can you still see the strokes in the shadows? Well, looking at my reference photo, I noticed those scuffs weren’t there and I wanted to achieve that dark smooth look. How should I do it? Right after some more tips in the next steps, you’ll see what I used to create that effect.
Step 11
For your reference, here are the pencils I use. Also, consider tones, shadows, and textures and see how they can affect your drawing.
Step 12
In this picture you can see how you hold the pencil. Overhand is detail or fine writing. And Underhand gives great coverage like shading. Practice swiping by starting in bold then lifting the pencil slightly for a lighter tone.
Step 13
Click this image to see how tones, shadows, textures, and reflections work.
Step 14
Take a close look at this photo for some highlights tips! I’ve always wondered how seasoned artists are able to create such fine and realistic tresses. My next step will tell you how. Also, I have a great tip that is to darken an upcoming area.
Step 15
Make sure you click this image with the paint tube. I have a really neat technique for you that will make drawing stray hairs so much easier. Finally, find out how I darkened the lapels of Kurt’s coat in the next step!
Step 16
I had to do this for you. You must be wondering how in the world did I get Kurt’s coat in such black color. I was helped with 9B Graphite Crayon (it’s a bit waxy) and it works great. This little tool is BIG. Check out the size comparison with my other 9B Monolithic Pencil (which I almost used with the nub). And look at the difference in their shade. OH! Big difference. If you want to go to jet black and gloss super fast, pick up that Graphite Colored Pencil at your nearest art store.
Step 17
This image shows the blending effect. Take some tissue (this works best for me), rub it gently on his skin. If you want to keep the tone even, don’t use smudged shadows on the paper towel as it can create more graphite. I also used a tissue on the DARK part of his lapel. I walked very lightly through the lining of his jacket. This is done so as not to blur the lines. If you just take a tissue and rub it hard all over the place, you will lose the line definitions in your drawing. Everything will blur together and you will have to repaint. I use chandeliers or stump blends to shade the strands and give a more pronounced shading at the lapel lines. These blend tools give softer or more blurred lines to better mimic realism. TIP: I sometimes rub my tortillon on a graphite pencil and shade more in detailed areas.
Step 18
Look at that rich black! That’s what 9B Graphite Crayon will do. Observe the difference in hair shade – very slight isn’t it. And the left lapel still doesn’t match my reference photo. Also, I didn’t paint and shade those intricate, tangled strands of hair. And it won’t take me all day to remove those sticky hairs. That’s right, I turn to my trusty white acrylic to save the day.
Step 19
My friend, if you stay with me that long and attract him, I take my hat off to you. Your patience, diligence, and hard earned work have paid off. This painting is yours to create whether it’s a new version of Kurt Cobain or it’s like this one. You’ve learned a lot and can apply it to other drawings you make. I hope I was helpful to you and that you had some fun. Please let me know how your masterpiece came out. I love liking, commenting and voting for my peep art from my tutorials! LOVE AND PEACE!!! *knot winds*


