How to Draw A Beyblade easy with this how-to video and step-by-step drawing instructions. Simple drawing for kids and everyone.
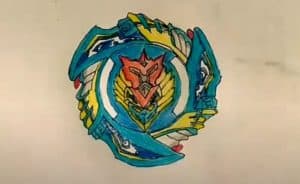
Please see the drawing tutorial in the video below
You can refer to the simple step-by-step drawing guide below
Step 1
The design that we will draw in this Beyblade tutorial can look complicated and scary, but you don’t need to worry!
We’ll break it down into smaller steps to make sure you don’t get overwhelmed during the process.
Beyblade often has the appearance of cyborgs and other characters are made into their design, and we will start with the head of one of these characters.
This header will be the focal point of this design.
First, draw some small triangles for the character’s eyes. Then we’ll draw some angled lines around these eyes to form a pattern of the head and face around it.
Once you’ve drawn this part as it appears in our reference image, we can move on to step 2.
Step 2 – Now add some details to the design on Beyblade
As you continue with this Beyblade drawing, we will start adding more and more layers to the design.
It can be easy to get lost in such an intricate design, so do your best to take it slow and follow the reference image as closely as possible.
For this part, we will draw sharper and more curved lines from the head that you drew in the previous section.
We will then add some more angular, pointed shapes to these sections as shown in the reference image.
Step 3 – Add a body part to this design
The lines and shapes we’ve drawn so far in this Beyblade tutorial are pretty curved and sharp.
This third installment will see you add some more rounded shapes to the mix to give the body of the character woven into the pattern design.
Start by drawing a circle in the empty space left in the center of the design you drew in the last step. Then draw a shape with four thick and short arms to form a thick cross.
Below that, we’ll draw four corner shapes that connect to each other, and these will have smaller shapes inside of them along with other smaller shapes that connect to their edges.
Step 4 – Next, draw a circle around the design
We’ll again add some more rounded elements to your Beyblade drawing in this next step.
There will be a thin, circular shape going around the parts you’ve drawn so far. They will almost form a complete circle, but there will be a small gap at its base.
Add some smaller rectangles and circles around this circle, and then we can move on.
Step 5 – Add Beyblade Top and Bottom Sections
We’ll move on to the final elements in the next few steps of our tutorial on how to draw a Beyblade! In this part we will draw some parts above and below the Beyblade.
They will be quite round and they can be drawn with a lot of curves and shapes.
This is another step where you should do your best to copy the lines exactly as they appear in our reference image!
Then we can move on to the final details in the next step.
Step 6 – Now, add the last elements of this Beyblade
Beyblade’s edges often jut out in an angled shape, and this helps them attack the opponent’s Beyblade. We will draw these parts in this part of your Beyblade drawing.
These sections will go to the left and right, they will stick out and have some triangles, angled inside them.
You can also change some details or add some other elements to create your own unique design!
Another idea is to draw a background that can show which Beyblade this Beyblade will be against.
Step 7 – Finish Your Beyblade Drawing in Color
Now you’re ready to finish by adding some color in this final step of our Beyblade tutorial!
Beyblades will usually come in vibrant colors, and this is the approach we took in our example image.
We used colors like blue, red, and yellow to really make the color pop. What color do you think suits it best?
It is recommended to use high-precision art mediums such as markers or fine markers as this design is highly detailed. What color and medium will you choose?
