How to Draw Gipsy Danger easy with this how-to video and step-by-step drawing instructions. Cartoon drawing tutorials for beginners and kids.
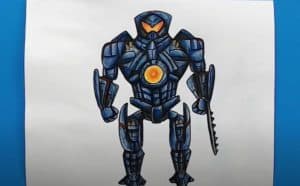
Please see the drawing tutorial in the video below
You can refer to the simple step-by-step drawing guide below
Step 1
Ok, let’s start with some instructions. Wow, even with these simple shapes, the big guy’s form is still evident. The central shape outlines the head and thorax. Next are the large shapes of the shoulders. From there we have the outer lines of the arms, ending with the square for the hand. The V-shape hovering below will be the robot’s pelvis.
Step 2
Alright, lighten up your guide lines and we’ll start with the line art. First, I want to get the main shapes of the head and chest. The important details here are the neckline and the armor plates located on the chest. Once those panels are in place, you can outline the chest and head panels.
Step 3
Wow, this is starting to look like Iron Man. Let’s go over the shoulders, adding a bit of shape to them. In the middle of the chest we have two concentric circles. They are a bit small horizontally because we are viewing the chest at an angle.
Step 4
Next, we’ll draw the outline of the collar and shoulder blades…at least, that’s what I’ll call them. I don’t know what these armor plates are really for. I guess they protect the neck and shoulder joints. With just the hemline, they look like Doctor Strange’s collar. Try to keep the outer corners a bit square, as we’ll be adding the metal edge later.
Step 5
For this step, start by adding armor shapes below the chest. They align with the bottom of the rib cage, so they curve down. You can imagine them wrapping around your back. Next, going over the pelvis, add some more shapes. Then we’ll move on to weapons. There are two armor plates on each forearm, and one on the back of the hand. We can change the angle of the panels by slanting the shapes and changing their thickness.
Step 6
Draw in a square for each bicep. Now we can also add a block tricep on an arm. Next, draw the “ribs”, which are curved armor plates that wrap around the sides of the chest. Think of it like wrapping a bookmark around a ball.
Step 7
Since this robot design is very complex, I have simplified things a bit. We will draw in some cubes to fill the inner arms. Regarding the stomach, I have outlined the main sections for you. They will then be broken down into smaller sections. I added some details to the pelvis.
Step 8
This is a good time to add the fingers as they will overlap the pins a bit. Since these are robotic fingers, they need to be cubic. Out of concern for time and simplicity, what I did was just use a few lines on the inside of each finger. A short line for the fingertips. On the back of each finger, I added a V at each knuckle, showing the separation of the digits.
Step 9
With the hands fully drawn, we can add thigh armor behind them. It would be a pain to do it the other way. You’ll want to erase as little as possible, especially if you’re drawing on paper. It’s always good to think about what to duplicate so you can fallback to elements later when you’re drawing. Anyway, the armor plates are rectangular, but try to keep the shapes rounded out from the center.
Step 10
Next, let’s add some shapes to fill in the matching areas. In fact, these are some very complex areas. I’ve simplified things a bit here. I try to think of them like action joints. Ball for hips. Swivel joints for elbows, etc.
Step 11
Now we will go into the details of the drawing. Sketch the shape of the visor. By exaggerating the curves a bit, I made the inner visor shape more precise. When you get to the color stage, the border is almost gone and the visor itself is clearly visible. If the shape inside has softer edges and points, it won’t have the same effect as in the black and white line art.
Step 12
Okay, now we’re going to draw the edges of those armor plates on top to give them some dimension. They are just metal plates with a slight curve. I exaggerated the shapes a bit to make the image more interesting. Add a spiral to the circle in the center of the chest. I’m assuming this is part of the engine, but it definitely lights up. It’s a major design element of this guy. We can start breaking down the stomachs now.
Step 13
For this step we mainly add paint stripes and some panel lines. Try to keep these lines parallel to the lines around them. This can be complicated, but keeping line spacing equal is key to a clean drawing. When your line is wobbly, then… yes. It still happens to me, so don’t sweat it too much. Oh, wait. I’m the one who brought it up in the first place.
Step 14
Ok, keep it simple, even in the details phase. Each bicep has a smaller circle in the center, with lines extending from the corners to each of the larger squares. The curves on his left biceps (our right) show the angle of the arm. Moving on, we can now subdivide the segments of the fingers. Fill in some panel lines on the pins. Add some detail to the joints and forearms. Don’t forget the little air vents on the face! Those are the important things.
Step 15
Here are some of the finer details. Overall, details on the abdomen and hands are probably the most important here. The longer lines on the fingers help give them the blocky, mechanical look we all want. On the stomach, use the first separator as a guide and draw curves that flow outward from the center, almost like the abs. Shapes from the shoulder blades up also help break up those shapes and give them a bit of dimension. The details on the face and visor are not necessary, but add more realism to the drawing. Use a thinner line for these, or the face will look messy. If you are drawing on paper, a thin pencil would work well here. 0.3 pencil or marker will do. If I were to write by hand, I would use a 005 Pigma Sakura Micron crayon for the small details. Inner borders can be done with number 05 and inner lines with number 01 or 02. Does that make sense? Maybe I need to post a drawing tool tutorial.
Step 16
For this final drawing step, I started by adding some black shadows to the hips and below the flank armor. From them, I decided to use some dashes or vertical dashes to add shadows and give dimension to some shapes. Shadows appear when shapes step back or move away from us and also where there is a large overlap of sections. Add some dust and scratches and some final panel lines, and that’s it. This fool is done.
Step 17
This is how he looks in black and white. There are some details I decided to add to the color stage. There are several boxes around his chest circle, and the number 34 on his shoulder pads. I also did the chest rotation a little differently, and added some panel lines here and there. Hope you enjoyed this guide. I haven’t drawn any robots in a while, so this was fun. Remember to post your results here when you’re done. Thanks for watching!

No Responses