How to Draw an Elephant Seal easy with this how-to video and step-by-step drawing instructions. How to draw ocean animals for beginners and All.
Please see the drawing tutorial in the video below
You can refer to the simple step-by-step drawing guide below
Step 1
Outline circles and ovals as shape lines for the seal’s body mass. Gently draw this with a #2 or HB pencil. Make sure you draw it as shown in the picture.
Step 2
Lightly draw two elongated red lines as shown in the image.
Step 3
Go ahead and draw curved lines representing the seal’s flippers. They don’t quite match so keep a close eye on where they go.
Step 4
Now draw the eyes and snout of the seal, called the proboscis.
Step 5
Now draw on the left side of the seal. Observe how the lines relate to the instructions and don’t forget the beach, his flippers and part of the sand pile ahead.
Step 6
This time, draw in the right side of the seal, including his furry scarf with cute little toes *wink*. Don’t forget the other side of the beach.
Step 7
I made this line drawing especially for beginners, so you won’t have to guess a second time. If you don’t want to do the shading and pencil blending, you can finish here. If not, let’s continue to the next step.
Step 8
This has a few more details. Draw the lines that are his wrinkles and speckled areas. Look at the direction of these lines to help create shadows.
Step 9
This is the ultimate line drawing made especially for you. If you don’t want to do the shading and pencil blending, you can stop here. If not, let’s continue with the pencil drawing.
Step 10
Here is a sketch done with a 0.7mm mechanical pencil. Look closely and see if your lines look like this. You can erase if some areas like eyes or nose don’t align. Use your kneaded eraser and kneaded eraser erase shadow contours or dark lines for a more realistic look when you shading. Shade transitions from dark to light (or vice versa) should be smooth…no harsh lines. Be patient with this, it’s not as complicated as you think. As you make more images, this will come easier to you.
Step 11
This time my Acrylics and 9B pencil dots won! Sandpaper, the new kid on the block has to lean back against my amazing Titanium White or Opaque Watercolors to hit the HIGHLIGHTS! Yaaah! Try it, you will love it!
Step 12
The image accompanying this step shows two different ways to hold your pencil to achieve certain effects. EXCELLENT: Holding a pointed pencil in normal writing with your fingers in the center or near the tip gives you fine control and fine/detailed strokes. UNDERSTAND: Hold the pencil at a 45-degree angle or near the table with the tip of the pencil under your palm with the pencil flat, giving you great coverage. With the #2 pencil, you have the lead side exposed for shading. But for a wider area, use a Cretacolor Monolith graphite pencil that doesn’t have a wooden case. The whole sharpened part is all lead, just like in the picture of the step. Practice toning values to help keep you in control.
Step 13
Special effects! How in the world do you create these scales and gills on mushrooms? The secret lies in the way you hold the pencil and the type of edge of the pencil, which will be explained in a later step. Look at the different effects in this step. Practice these strokes and see the difference.
Step 14
CUBE, BALL, CONE, & CYLINDER – These are shapes that are everywhere in nature. It helps you know how to shade, add textures, and more. Recognize these shapes, simplifying the landscape or subject you are looking at. TONE, SHADING, SHADOW, & TEXTURE – Tone is the actual color, shadows are the part of the object away from light, shadows cast by objects and textures are rough, smooth, hilly, sharp, dense, etc. , the feeling or appearance of an object.
Step 15
You can use a rubber kneaded eraser to make reflectors on the sides of the caps and stems, within the scale of the first mushroom, in the gills of the second, and on the stem. Remember that the reflected light is not pure white – it is mid-tone. Your blending tools add a smoother tone to your drawing… tissue or toilet paper adds an even tone to large areas and fades or fills in many pencil strokes. Blend stumps or toruses to blend smaller areas, which I used on mushrooms and background. And if you have enough graphite on them, you can show textures, lines, or small shaded areas. Great, isn’t it? YES! We’re rockin’ and rollin’ right now! Let’s start with the next step.
Step 16
The image here is a great exercise for value shading. I have a secret little trick for you to make things easier. You can download it to your desktop. First click on the image to get access to the full size. By right-clicking the mouse, you can select “Save Image As.” It will save to your desktop.
Step 17
After printing out some of the samples above, practice shading in the values like this one. You familiarize yourself with this shading technique giving you more control and confidence.
Step 18
This is the first start with pastel color application. If you draw the whole picture in pencil sketch, this is where you will sketch in circles or small lines to shade areas. It will take hours to cover all that area with a pencil. I chose to shade with pastels. In a few strokes I had coverage. Apply a medium to dark gray light to the seal and the beach. I added a dark gray color to the shadowed areas on the flippers. It looks like a mess, but that’s how some starter projects come out. Be patient with you and keep applying white, gray and black layers. You will have a great result.
Step 19
Here I used my blend stump to “draw” more of the folded areas. I also added more shadows to the body of the seal. I mixed soft with paper towels for extra smoothness on seals and beaches. I followed the marked areas lined with my kneaded eraser to clean the white.
Step 20
First I sketched more shade on the body to bring out the wrinkles and highlights. After mixing the pencil with my stump, you can see a smoother difference after applying. I took my kneaded eraser and reduced the shading of the outline around the seal. Then I sprayed the painting with “Krylon Workable Fixatif” to adhere the pencils and pastels to the paper for a smudge-free and workable surface.
Step 21
I fill in the background with a light to dark gray chalk. I smooth the background with a paper towel and my blended stump. Then I added dots and shadows to the sand with my Graphite 9B pencil while looking closely at the reference. I also added more detail on the seal’s chest area with white chalk and blended it a bit.
Step 22
Gosh! I covered the edges of the background with 9B Graphite Crayons, very smooth. Then I intentionally added reflectors on the seal’s flippers, muzzle and back to make it pop! I also added dark outlines to the shadow of the seal so it wouldn’t blend in with the sand. To help you learn specific areas of highlights, tones, textures, and more, the next two steps will show you.
Step 23
Without highlights, your painting will have a flat appearance. Click this image to learn how to make your own POP photo!
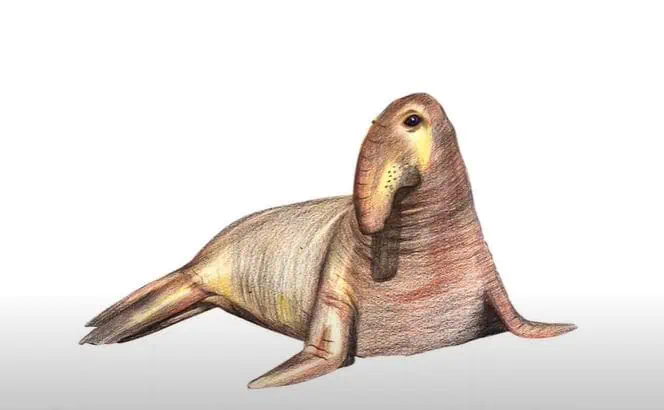
Step 24
Click on this image to see how Tone, Shade, Texture and Reflection affect the Elephant Seal. Check out Wikipedia for detailed information on these ocean floor seals. I am closing right now. But all of you are amazing and I’m glad to have worked with you on this tutorial. Like, comment and show your love here. And I will definitely reply back soon or last. Love, peace, happiness, success and better days come to you! *hug* *blowkiss*


