How to Draw a Realistic Tornado easy with this how-to video and step-by-step drawing instructions. Pencil drawing tutorials for beginners and All.
Please see the drawing tutorial in the video below
You can refer to the simple step-by-step drawing guide below
Step 1
Draw a curve for the tornado’s cloud top and a diagonal for its vortex. Gently draw this with a #2 or HB pencil. Make sure you draw it as shown in the picture.
Step 2
Lightly draw two parallel red lines for the cloud mass above the horizon.
Step 3
Now draw red diagonal lines vertically for the wind direction of the clouds (this guides you to swipe your clouds in the wind direction). On the horizon is a dark strip of land. Represent this by drawing the final red horizontal line.
Step 4
Now draw in the vortex of the tornado.
Step 5
Light sketch on clouds on top of tornado. Draw those small, circular lines. Notice how those hanging clouds (probably rivets) are at the same inclination as the vortex.
Step 6
Observe the location of the next cloud relative to the instructions. Draw squiggly lines. NOTE: You are free to draw this, but stay close to the slant of those hill lines.
Step 7
Here’s another interesting part of the drawing. Draw two red horizontal lines for the two cloud bellies. Also add to your land, adhere to your principles. Don’t forget the tiny power lines. Use squiggly lines in the direction of the wind for the dirt and debris swirling at the base of this tornado.
Step 8
I made this line drawing especially for you if you don’t want to do the pencil shading and blending. If not, let’s continue with the pencil drawing.
Step 9
Here is a sketch done with a 0.7mm mechanical pencil. Look closely and see if your lines look like this. You can erase if some areas like eyes or nose don’t align. Use your kneaded eraser and kneaded eraser erase shadow contours or dark lines for a more realistic look when you shading. Shade transitions from dark to light (or vice versa) should be smooth…no harsh lines. Be patient with this, it’s not as complicated as you think. As you make more images, this will come easier to you.
Step 10
TOOLS! I’m introducing the grid. It’s a great way to convert images to your paper sketches with precision and speed. Draw square grids on your reference photo print (they can be one-inch squares). Count how many are in columns and rows. You can then use the same number of squares in your columns and rows. But the cool thing is that you can scale your picture bigger by doubling, tripling the square size. *** IMPORTANT: T-SQUARE and TRIANGLE produce straight lines or squares – great for making your grids, even diagonals and lines. Remember your mechanical pencil(s) at 0.7mm use HB or 2B. Your graphite pencil is of excellent quality at 9B (black, bold, and smooth). Electric pencil sharpener, kneading eraser, blending tool/stump, and for easy highlighting, white acrylic and paintbrush. Leaving that space blank to represent white is also great. Don’t nod at me, now. Continue because I have some information about tornadoes in the next step.
Step 11
Click this image for information and a few other tornado websites.
Step 12
Special effects! How in the world do you create scary clouds and tornadoes? The secret lies in the way you hold the pencil and the type of edge of the pencil, which will be explained in a later step. Look at the different effects in this step. Practice these strokes and see the difference.
Step 13
The image accompanying this step shows two different ways to hold your pencil to achieve certain effects. EXCELLENT: Holding a pointed pencil in normal writing with your fingers in the center or near the tip gives you fine control and fine/detailed strokes. UNDERSTAND: Hold the pencil at a 45-degree angle or near the table with the tip of the pencil under your palm with the pencil flat, giving you great coverage. With the #2 pencil, you have the lead side exposed for shading. But for a wider area, use a Cretacolor Monolith graphite pencil that doesn’t have a wooden case. The whole sharpened part is all lead, just like in the picture of the step. Practice toning values to help keep you in control.
Step 14
CUBE, BALL, CONE, & CYLINDER – These are shapes that are everywhere in nature. It helps you know how to shade, add textures, and more. Recognize these shapes, simplifying the landscape or subject you are looking at. TONE, SHADING, SHADOW, & TEXTURE – Tone is the actual color, shadows are the part of the object away from light, shadows cast by objects and textures are rough, smooth, hilly, sharp, dense, etc. , the feeling or appearance of an object.
Step 15
You can use the rubber eraser to make lights reflect on the sides of a tornado, in clouds forming to catch the sun’s light, or to enhance the horizon. Remember that the reflected light is not pure white – it is mid-tone. Your blending tools add a smoother tone to your drawing… tissue or toilet paper adds an even tone to large areas and fades or fills in many pencil strokes. Mix stumps or torchlights that blend smaller areas. And if you have enough graphite on them, you can show textures, lines, or small shaded areas. Great, isn’t it? YES! We’re rockin’ and rollin’ right now! Let’s start with the next step.
Step 16
The image here is a great exercise for value shading. I have a secret little trick for you to make things easier. You can download it to your desktop. First click on the image to get access to the full size. By right-clicking the mouse, you can select “Save Image As.” It will save to your desktop.
Step 17
After printing out some of the samples above, practice shading in the values like this one. You familiarize yourself with this shading technique giving you more control and confidence.
Step 18
* TIP: Before I forget, I want to say this. For more realism and smooth transitions between shaded planes and highlights, I lightened the outlines so they’re barely visible. Now Enable with this step. This is the first start with pastel color application. If you draw the whole picture in pencil sketch, this is where you will sketch in circles or small lines to shade areas. It will take hours to cover all that area with a pencil. I chose to shade with pastels. In a few strokes I had coverage. Apply medium to dark gray to clouds and tornadoes. I added black to the land. It looks like a mess, but that’s how some starter projects come out. Be patient with you and keep applying white, gray and black layers. You will have a great result.
Step 19
Here, I used my blend stump to “draw” more lines and add shadows to the clouds, tornadoes, and land. I worked in a circular motion on the side of my blend stump (below). Me with walls made of clouds, sometimes sweeping away dirt and debris from tornadoes. I smoothed the larger parts of the cloud with a paper towel… in a circular motion. Then after that, I sprayed the painting with “Krylon Workable Fixatif” to firmly adhere the pencils and pastels to the paper for a smudge-free and workable surface.
Step 20
I sketch with more shading in tornadoes and clouds with 9B and 0.7mm mechanical pencils. I identified areas of cloud cover by looking closely at the reference image. The sketch is done in circles and diagonals, close to the inclination of the cloud and tornado.
Step 21
I made this pencil blend separately so you can see the difference after applying. Of course, I used my blend stump. I can wear graphite to smooth out lighter areas to appear darker. Graphite lines and stains cannot be discerned. Again, observe the difference.
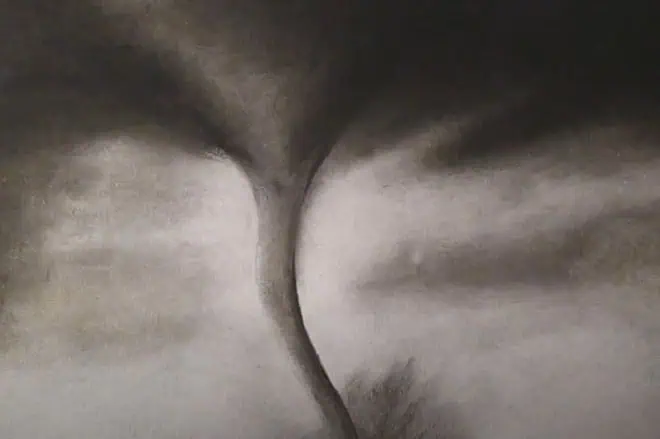
Step 22
Finally, the storm has passed. I finally FINALLY FINDED!!! With white and light gray pastels, I added more highlights to the clouds. And, yes, I darkened the ill-fated baby of a tornado. They may be beautiful, but dangerous and deadly. That is a bad thing. (*** TIP: When applying those white highlights, they sometimes blend into the darker background not producing a clear white, which is more realistic in this case!) Now the whirlwind Our vortex “pops” up! To help you learn specific areas of highlights, tones, textures, and more, the next two steps will show you.
Step 23
Without highlights, your painting will have a flat appearance. Click this image to learn how to make your own POP photo!
Step 24
Click on this image to see how Tones, Shadows, Textures and Reflections affect this tornado. Tornadoes usually travel over the edge of a storm cloud. That is why a lot of the time the sun can be seen behind it. Check Wikipedia and other sites for clear information on this phenomenon. I am closing right now. But all of you are amazing and I’m glad to have worked with you on this tutorial. Like, comment and show your love here. And I will definitely reply back soon or last. Love, peace, happiness, success and better days come to you! *hug* *blowkiss*


