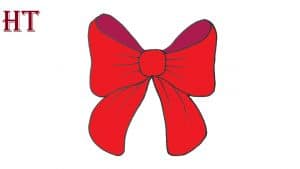
How to Draw a Ribbon Easy with this how-to video and step-by-step drawing instructions. Learn to draw for beginners and kids.

Please see the drawing tutorial in the video below
You can refer to the simple step-by-step drawing guide below
Step 1
Start drawing the ribbon by creating a center or knotted part.
Make a square that looks like a square and this will form the button.
Step 2 – Draw the left part of the ribbon
It’s time to create the reverse side of the ribbon.
Draw a triangle-like shape for the left part of the ribbon, like the one in the illustration.
Step 3 – Draw the right side of the ribbon
This is the same as Step 2. But this time you will draw the right part of the ribbon.
Again, draw a triangle-like shape.
Step 4 – Draw the left lace of the ribbon
This step will form the end of the ribbon’s tie.
This shape will look like another triangle like the ones in Steps 2 and 3, except the ones in Steps 2 and 3 are drawn horizontally while this new shape will be drawn roughly vertically.
Step 5 – Complete the Ribbon’s Form
You drew the reverse side of the tie in Step 4. This time, do the same for the right side of the ribbon tie.
You have now created the main outline of the ribbon.
Step 6 – Draw the dimensions on the left side
In this step, you’ll make your ribbon realistic by adding a crease at the top.
Draw a curved line connecting the top left part of the part you drew in Step 2 with the top left part of the part you drew in Step 1.
Step 7 – Draw the dimensions on the right side
In this step, you will simply repeat what you did in Step 6.
But this time, you’ll do it for the right part (the one you drew in Step 3).
Step 8 – Add some pattern on the bow of the ribbon
You will make the ribbon look more realistic by adding a “knot” effect.
You will draw short curved lines in two ways: horizontally on the outside edge of the square (Step 1) and vertically inside the square.
Step 9 – Add some pattern on the edge of the ribbon
You will repeat what you did in Step 8.
But this time, you’ll be adding longer diagonal, curved lines inside the sections you drew in Steps 4 and 5, as shown in the illustration.
Time to make this ribbon look better than it already is by adding color! Add red or pink on all parts of the ribbon.


