How to Draw A Pentagram easy with this how-to video and step-by-step drawing instructions. How to draw for beginners and kids.
Please see the drawing tutorial in the video below
You can refer to the simple step-by-step drawing guide below
Step 1
The first step in this tutorial on how to draw a pentagram looks complicated and confusing at first, but it’s not as bad as it looks!
You will find this step much easier if you use a ruler and pencil to draw. Using your ruler, you’ll draw a series of lines that roughly look like different triangles superimposed on each other.
However, using the reference image as your guide, you will find that there will be gaps between some lines.
Again, it may seem complicated but if you follow the instructions closely as you draw you should have no problems!
Step 2 – Next, add some lines to create the inner shapes of the pentagram
In this pentagram step, you’ll use some straight lines to create a sharp shape at the top of the pentacle.
As you can see in the reference image, it will look almost like an arrowhead is missing one side. We’ll be adding a few of these shapes in the next few steps, so let’s move on to step 3!
Step 3 – Now draw another pointed shape
You will draw another pointed shape like the one in the previous step for this part of the tutorial on how to draw a pentagram.
This shape will face to the left, and it will look very similar to the first shape you drew except for its position.
Step 4 – Next, draw another pointed shape
Now that you can draw these pointed shapes, you should have no trouble drawing a few more for your next pentagram steps!
This will be on the right hand side of the pentagram. The reference image will show you how these shapes will repeat with each other, and some will look like they’re connecting.
Step 5 – Next, draw another pointed shape
You’re almost done with the spikes you’ve drawn, but there’s still some more to add in this pentagram tutorial!
This next one will be on the bottom right of the pentagram as shown in our reference image. With that, we only have one more to add in this guide.
Step 6 – Draw the final pointed shape
You’ve drawn many of these spikes for your pentagram so far, and you’ll be drawing the final shape in this step of the tutorial.
That should do for the interior of the pentagram and you’ll be ready for the final elements in the next step. Before continuing, make sure to rewrite the lines with a pen if you haven’t already done so!
Step 7 – Next, draw the final details of your pentagram
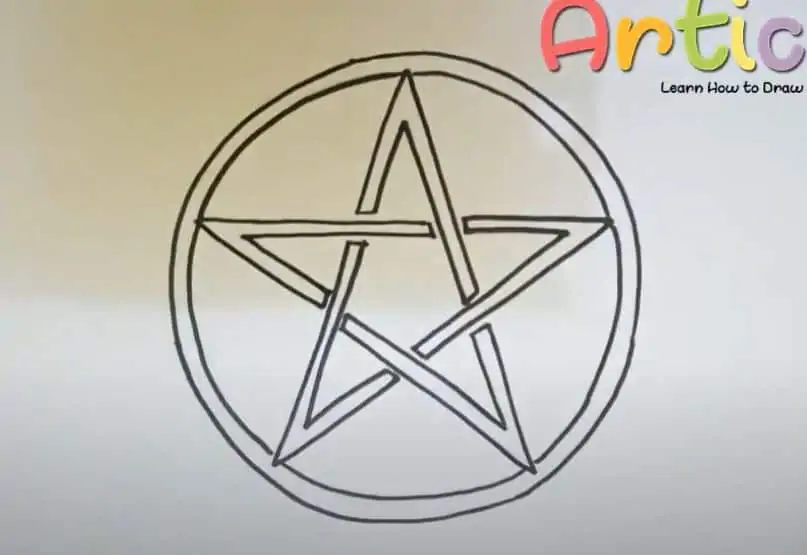
Now that you’ve drawn the star portion of the pentacle, you can add the final elements and strokes in this step of our pentagram tutorial.
The main element to add is a circle around the star shape you are working with. When drawing a circle, it can be much easier if you use a tool like a drawing compass. This can help you easily create a perfect circle.
After you finish drawing this circle, your pentagram is pretty much done! However, before you continue, you can also add some details of your own that you may want.
You can paint some texture on it, change the design or draw some symbols on the figure to make it look better!
That’s completely up to you, so make sure to get creative with it and have fun as you personalize this drawing.
Step 8 – Now finish your pentagram with some colors
That brings you to the final step of drawing the pentagram! With this step you can bring your drawing to life by adding some amazing colors to it.
In our reference image, we used a different light color for each pointed shape that makes up the inner star. Then we used a more muted brown for the empty space around it.
This is just an example of one of the many ways you can color this, so you should make sure to let your creativity flow and color it with your favorite colors!
Once you know how you want to color in this image, you can also experiment with your favorite art tools and media.
You can use mediums like paints, watercolors, pens, crayons and markers to get any kind of color you want!
We can’t wait to see how you bring this image to life with your colors.


This guide was super helpful! I always struggled to get the angles right, but your step-by-step instructions made it so much easier. Thanks for sharing!
Great step-by-step guide! I’ve always found drawing a pentagram challenging, but your tips made it so much easier. Can’t wait to try it out with my kids!
Thank you
I loved this step-by-step guide! The illustrations were super helpful, and I appreciate how you broke down each part of the pentagram. Can’t wait to try drawing it myself! Thanks for sharing!
Thanks for your encouragement!
5
I found this guide super helpful! The step-by-step illustrations made it really easy to follow. I’ve always wanted to draw a perfect pentagram, and now I feel confident I can do it. Thanks for sharing!
Thanks for this detailed guide! I’ve always wanted to learn how to draw a pentagram properly, and your step-by-step approach made it easy to follow. The tips on keeping the lines straight were particularly helpful. Can’t wait to try it out!
Thank you!
This guide was super helpful! The step-by-step approach made it easy to follow along. I loved the tips on shading too; it really brought my pentagram to life. Thanks for sharing!
This step-by-step guide is incredibly helpful! I’ve always struggled with getting the angles right, but your tips made it so much easier to draw a perfect pentagram. Thanks for sharing!
4.5
This step-by-step guide was super helpful! I’ve always struggled with drawing a pentagram, but now I feel more confident. The visuals made it easy to follow along. Thank you for sharing!
Thank you for this detailed step-by-step guide! I really appreciate the clear instructions and visuals. I can’t wait to try drawing a pentagram myself!
This step-by-step guide was super helpful! I’ve always wanted to draw a pentagram, and your tips made it so easy to follow. Can’t wait to try it out!