How to Draw A Peace Sign easy with this how-to video and step-by-step drawing instructions. How to draw for beginners and everyone.
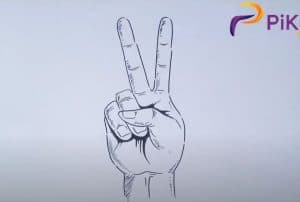
Please see the drawing tutorial in the video below
You can refer to the simple step-by-step drawing guide below
Step 1
As we mentioned in the intro, hand-drawing can be frustrating and difficult at best, as it can be a challenge getting the fingers to look accurate.
To make things easier in this peace sign tutorial, we’re going to take it step by step and break it down into simple shapes and lines.
The main focus of this first step will be on the middle and index fingers extended as a peace sign.
To draw these, you can start with some long, curved lines that join together.
As you can see in the reference image, these two fingers will be the same length.
The right side of the hand will be fairly straight, while the left will have two protrusions for the knuckles of the next two fingers.
Step 2 – Draw the wrist of the hand
You’ve drawn some finger outlines, so now you can focus on the side of the palm and the wrist of the hand.
First, use a slightly curved line going down from the two knuckles that you drew in the previous step. This will form the left side of the palm.
The wrist can then be drawn with some lines mainly going down from the palm, going horizontally to cut it and finally vertically back to the hand.
The hand cut at the wrist can also be changed to suit your taste. You can omit that line or replace it with a curve if you want.
Step 3 – Now we will draw a thumb for your peace sign drawing
You’re making some great progress in this tutorial on how to draw a peace sign! Moving on, we will show you how you can add thumbs to your hand.
You will use a lot of curves for this element, and the first one will go into the space to the right that you have left between your index finger and wrist.
This will then extend further into the hand, where it will curve in on itself to form the tip of the thumb. With that, we can continue building finger designs in the next few steps
Step 4 – Draw some more fingers on the hand
We’ll leave the thumb of your peace sign drawing for the time being and get back to focusing on the other fingers.
You can use more curved lines extending down from the knuckle bumps you drew earlier. The right finger will be under the thumb, as you can see in the reference picture.
We haven’t painted nails on most of the fingers yet, but due to the angle of these fingers, you might be able to paint some nails on them.
Finally, add some lines to the palm in the direction of the fingers to get some more detail.
Step 5 – Now you can add some final details to your peace sign
Before you move on to coloring your picture, we have a few more details to add in this step of the tutorial on how to draw a peace sign.
The main details that you should add are on the fingers to indicate the position of the joints. You can add two lines to your index and middle fingers to do this.
Then draw another line at the point where these two fingers meet.
You can then finish this step by adding more fine lines to the knuckles of the two flexed fingers and on the wrist.
Before you continue, be sure to add any other fun details you’d like! Perhaps you could paint over some jewelry or get creative by decorating your hands with some 60s-inspired patterns.
How would you personalize your peace sign drawing?
Step 6 – Finish your peace sign drawing with some color
Now that you’re done creating your peace sign drawing, it’s time to color it! You have many options to consider when doing this, so make sure to let your creativity flow!
You can choose some more realistic skin tones if you want, and you can use your own hands as a reference color!
You can also be more stylish with it by using some of your favorite bright colors to create a more psychedelic look.
After you know what colors you want to use, you can still opt for a fun art medium!
Whether you use some bright acrylics and crayons or create a more subtle look with watercolors, we know your images will look amazing!
