How to Draw a Knot with this how-to video and step-by-step drawing instructions. Pencil drawing tutorials for beginners and all.
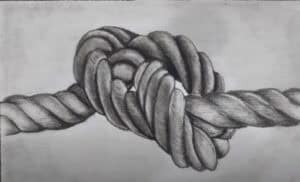
Please see Knot drawing tutorial in the video below
In this lesson, I will tell you and show you in detail how to draw a knot. At first glance, it may seem difficult, but in fact, you can easily cope with this task with the help of this step-by-step guide.
To draw a knot, you must carefully follow all the drawing steps and use the hints.
This lesson is specially created for beginner artists and children. So let’s get started with this cool tutorial. I am sure you will have great results.
Material
– Pencil
– Paper
– Eraser
Knot Drawing Step by Step
Step 1. Draw the outline of the knot.
To do this, you need to depict a circle.
Step 2. Draw the end of the rope on one side.
Draw two horizontal lines from the circle to the right.
Step 3. Add the end of the rope on the other side.
Repeat the previous step and draw the same horizontal lines on the other side.
Step 4. Draw woven wire on one side.
Using smooth circles, draw three elements.
Step 5. Add the woven wire on the other side.
On the right side, depict the weaving of the rope using successive circles.
Step 6. Detail one end of the rope.
On the left side, add woven wire using wavy lines placed one after another.
Step 7. Detail the second end of the rope.
Repeat the previous step and describe the weave of the rope on the right side.
Step 8. Correct the inaccuracies.
At this stage, remove all excess lines.
Step 9. Color the knot.
Use a pencil to darken the string or use a light brown color.

No Responses