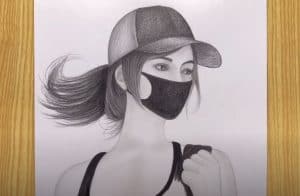
How to Draw a Beautiful Girl Face with Mask easy with this how-to video and step-by-step drawing instructions. Pencil drawing tutorials for beginners and everyone.

Please see the drawing tutorial in the video below
► Used things:
1.Pencil Name : 9B ( MONO ART DRAWING PENCIL ).
2. Cotton Buds (You can use Tissue paper, Paint/makeup brush or cotton buds instead of this blending stump, etc.
Girl Face with Mask Drawing:
Step 1: Basic outline
Start with a slight contour of the oval of the face. Draw a vertical line in the center and a horizontal line in the middle. This will help you place facial features symmetrically.
Step 2: Eyes and eyebrows
On the horizontal line, draw two elongated almond shapes for the eyes. Leave space for the mask above and below the eyes.
Above the eyes, sketch the eyebrows. You can adjust their shape to convey the desired expression.
Step 3: Nose and mouth
Below the eyes, draw a small circle for the nose.
Just below the nose, draw a curved line for the top edge of the mask.
Draw lips below the edge of the mask. You can make the lips visible under the mask.
Step 4: Mask
Outline the mask, following the contours of the face. The mask must cover the nose and mouth area. You can make the edges of the mask curved and graceful.
Add details to the mask, such as folds, folds, or patterns. This adds depth and interest to your artwork.
Step 5: Eyes and details
Draw eyelids and eyelashes around the eyes. Add more depth by shading the eyelids and the area around the eyes.
Define the nose by adding shadows along the sides of the nose.
Add shadows around the edges of the mask to make it look slightly raised from the skin.
Step 6: Hair
Sketch the hair, frame the face. You can experiment with different hairstyles to enhance the girl’s features.
Add shine and texture to hair, using light strokes to show volume.
Step 7: Face and Skin
Shade the skin with light strokes to add dimension and contour to the face. Focus on areas with natural shadows, such as the sides of the nose and under the chin.
Use the eraser to lightly lighten areas that need highlighting such as the bridge of the nose, forehead, and cheeks.
Step 8: Final Details
Refine the eyes by adding pupils, reflect, and add depth to the irises.
Adds subtle shine and highlight to lips, enhancing their three-dimensional appearance.
Adjust any proportions or details that need fine-tuning.
Step 9: Color (optional)
If you want to add color, use colored pencils, markers, or digital tools. Choose colors that complement the girl’s features and the mood of the artwork.
Apply light, incremental layers of color to achieve the desired intensity.
You can see more beautiful girl drawings here:
Taylor Swift Drawing with Pencil || How to draw a beautiful Girl
Kate Upton drawing | How to draw a beautiful girl | Speed drawing


5