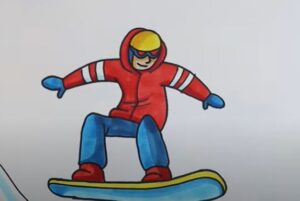
How to Draw a Snowboarder with this how-to video and step by step drawing instructions. Easy drawing tutorial for beginners and everyone.

Please see Snowboarder drawing tutorial in the video below
You can refer to Snowboarder simple step by step drawing guide below
Step 1. Create ski goggles
Start by drawing the wavy outline of the lens. Next, add the rectangular strap of the ski goggles.
Step 2. Sketch the bonnet
Draw the curved outline of the skier’s hat on top of the head.
Step 3. Draw the head
Next, draw the U-shaped outline of the head. Add two circles for the eyes. Then, draw short curved lines for the nose and mouth.
Step 4. Create body
Start by drawing the turtleneck collar. Next, form the vertical shape of the torso.
Step 5. Add arms
Add the elongated shape of the sleeve. Then, create the outline of the glove at the end of each sleeve.
Step 6. Sketch the legs
Sketch the curved shape of the leg as shown.
Step 7. Add constraints
Draw the outline of the constraints. Then, form the curved shape of the belt.
Step 8. Attach the ski
Forms a long ski attached to the binding.
Step 9. Complete the snowboarder drawing
It’s time to add some color to our ski drawing! First, shade the skin with a peach pencil and the eyes with a black pencil. Next, color the jacket with an orange pen. Now, use a dark gray pencil to color the gloves and pants as well as the strap of the goggles. Then, use light blue to color the lenses of your goggles. For the bonnet, use a blue pencil. Finally, color the snowboard with a bright red pencil and the outlines in gray.


