How To Draw The Colosseum easy with this how-to video and step-by-step drawing instructions. How to draw step by step for beginners and all.
Please see the drawing tutorial in the video below
You can refer to the simple step-by-step drawing guide below
Step 1
Before anything else, you need to find some reference to the image. The worst thing you can do is try to draw such a recognizable structure without a proper reference. Even non-experts will know if you just talk. The first step here is to place a checkered line in the center of the page. This is mainly a guide line. Next, draw two upward lines on either side of the image area. This was the basis for the walls of the Colosseum. From the perspective of a person standing on the ground looking up, the outer walls are not a perfectly flat plane. Instead, they lean inward and narrow upward.
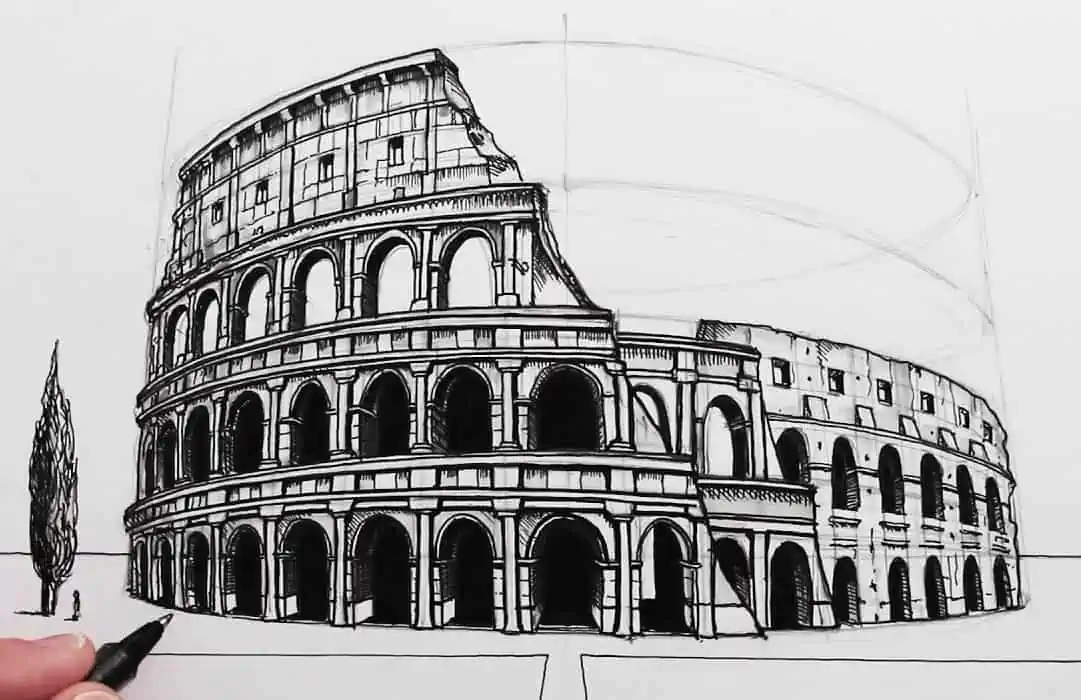
Step 2
The overall shape of the Colosseum is cylindrical. Check your references. What you want to do here is put some curves representing each level of the structure. On a blueprint, these would be straight, horizontal lines. However, in view, the lines become curved. Think of it like a rope wrapped around a paint bucket.
Step 3
Taking a closer look at the reference, align the curves than run parallel to your previous guide lines. This is the framework for the various ledges, moldings and foundations of the different floors of the building.
Step 4
Check your references. Some of the building’s walls were still solid and straight, but others were broken and jagged. Start connecting those curves with the appropriate line style. We also indicated the thickness of the outer wall layer, so the whole drawing had a solid sense of shape.
Step 5
This step is a bit tedious. Again, check your references before drawing. What we’re doing here is putting guide lines for all the domed openings that are the recognizable feature of the Colosseum. The openings on each level match, so you can’t open them freely. Start in the middle with near-perfect reticle lines. As you move outward to the left and right, your lines will start to tilt inward slightly. Always compare your line with the centerline, line, and curve/title of the exterior walls.
Step 6
Some more technical drawings here, as we move on to the arch at the top of all the holes you just blocked. If you are doing this on a computer, there are several techniques you can use to achieve these curves. I used the pen tool, but I can also use the shape tool. Remember, you can always drop in an ellipse and erase the bottom half to create an arch. If you are drawing by hand, you can use a plastic pencil or just try to have a steady hand. With pen and ink, I will draw even more guide lines and then draw curves freely. Go ahead and draw the inside of the arch. This is where you really get a sense of the depth in the layers of the structure. For the bottom part of the arch, you will use a single point perspective. For the sake of simplicity, you just need to remember that all backward lines go towards the center of the image. For a view like this, that should be enough to do the trick. You can frantically put perspective lines all over the place, but as long as you keep checking your reference and keeping that center point in mind, you’ll be fine. However, for more complex camera angles, knowledge of the right angle of view will be absolutely necessary.
Step 7
There is no red line here. Why not? For this step, you don’t actually draw anything – you erase! Your drawing has become busy with all sorts of guides and has an overall sterile, blocky quality to the image. The first thing you want to do is go in and carefully remove all of your build lines. This will leave you with (hopefully) perfect archways, and you can call it a day at this point. However, we are not done yet. The Colosseum is really old and broken, so you want to show that in your drawing. Now, this is where the difference of methods comes in whether you are using a computer or pen and paper. For the traditional drawing, you’ll want to ink your lines using a slightly rougher technique. However, on a computer, you will most likely have a very clean, sterile image. The solution is to go in and start cutting into your artboard with the eraser tool. As you begin to remove the smooth edges of your lines, the building will begin to take on a new dimension. It is no longer a blueprint – it is now a work of art.
Step 8
Adding details is my favorite part of drawing, but of course you can’t do that without finishing your basic drawing. If you’ve done your job correctly, this is well-rewarded. It’s like a desert. You still want to check your references, but you can turn your brain off for a while as you get lost in all the little details and textures that literally turn your drawing.
Step 9
This step is optional, depending on whether you want to colorize your image. If you are going to leave it as a black and white drawing, you should really go in and block out all the main shadow areas from your reference. Recheck all your previous work and add details and textures as required. If there are any areas that look like a flat figure (but shouldn’t), look at the general perspective of the surrounding shapes and give some pertinent details.
Step 10
Color image. There are countless methods of coloring a line drawing. I just kept it really loose with the brush tool and was happy with it. You can rely on the drawing as it is, but you can also go in there and literally paint with the Brush tool to clarify shapes or add more texture to parts of the drawing. Try not to leave any large blocks of color, as that will blow your image out again. That’s it! You are done! Congratulations!


