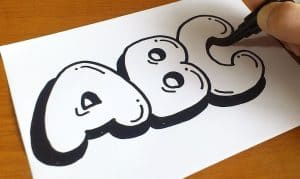
How to Draw Bubble Letters easy with this how-to video and step-by-step drawing instructions. Easy drawing tutorial for beginners and kids.

Please see the drawing tutorial in the video below
You can refer to the simple step-by-step drawing guide below
Step 1
For this first step in our tutorial on how to draw bubble letters, you’ll need a pencil to help you plan.
We will focus on the first three letters of the alphabet for this tutorial, but once you understand it, you can apply what you learn to other letters and numbers.
Now use your lightest pencil to draw A, B and C as they usually appear. We are using pencils for now, as they will only be there to guide you and won’t show up in the final image.
Step 2 – Draw more shapes for your plan
Now that you have drawn the letters from step one, you can continue using the pencil to create more shapes on them for this part of your bubble letter drawing.
For the letter A, you can use two larger ovals at horizontal corners that touch each other at the top. You can then use another smaller oval between them for the center of the A.
Then for the letter B you can use a long, fat oval with two thin and curved shapes for the injured parts of the letter.
Finally for the letter C, you can use a curved, sausage-like shape to create this letter on the plan you drew.
Step 3 – Now we will start drawing the last lines of the letters
We’ve used pencils so far in this tutorial on how to draw bubble letters, but from this point on you can start using your pen.
Using the shapes that you drew in the previous step, you can start tracing around the edges of these shapes on the left side of the letters.
As you can see in our reference image, we will draw the other sides of the letters in the next few steps.
Step 4 – Complete Outline of Your Letters
In the next step of your bubble lettering, we’ll finalize some outlines.
Carefully draw around the pencil shapes you drew earlier to complete the outlines of the letter A and the letter B. Then use two small, inward curved lines over the letter C.
Step 5 – Now you can complete the final details
You should finally be able to finish drawing the letters that you’re working on in this step of our how to draw bubble letters tutorial.
To complete these shapes, you can draw a small triangle inside of the letter A. For the letter B, you can use two small circles inside each of the letter’s bubbles to make holes in the top. they.
Finally, you can draw the rest of the letter C. Now that these letters have been drawn with the pen, you can erase the pencil lines you used.
Before moving on to the final step, you can use the steps in this tutorial to draw more letters of the alphabet!
If you want to do this, then just follow the steps of drawing the letters as they appear and then use some basic shapes to build on top of that skeleton.
Once you understand it, maybe you can write your name in this style!
Step 6 – Finish your bubble lettering with some colors
Your drawing of bubble letters is done at this point, and there’s only one thing left to do! Now that they’ve been painted, you can bring them to life with some amazing colors.
This is the step where you should really let your creativity flow as you choose the colors you want to use.
This typeface is suitable for fun occasions and they give off a bright and happy vibe when you look at them.
For that reason, if I were to color this bubble lettering, I would use the brightest, most vibrant colors I could. That being said, it would also look great with some more muted colors if you like!
Once you know what color you like for this image, you can have fun choosing the art mediums you want to use to bring the color to life.
If you choose a lighter palette, then things like acrylic paint, crayons or markers will help make the colors pop!
If you prefer a softer look, then things like watercolors or crayons would be great for that. How would you color in your drawing?


