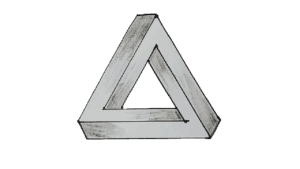
Optical Illusion Triangle 3D drawing easy, cool drawing for kids. How to Draw an Optical Illusion Triangle for beginners with this how-to video and step-by-step drawing instructions. How to draw 3D step by step for everyone.

Please see the drawing tutorial in the video below
You can refer to the simple step-by-step drawing guide below
Step 1
Sketch an inverted equilateral triangle. This will be the center of your triangle.
Step 2
Lightly sketch two parallel lines outside one side of the triangle. The lines should be equally spaced. Take caution that your lines are drawn straight.
Step 3
Do this for each of the other two sides. Your sketch should look like three triangles nested together.
Step 4
Choose one side of the “center” triangle. Extend one end of that straight line until it reaches the “middle” triangle.
Step 5
Find the same side of the “middle” triangle. Extend one end of that straight line, in the same direction as before, until it reaches the “outside” triangle.
Step 6
Repeat steps for the other two sides of the triangle.
Step 7
Erase short segments so that the triangle begins to look three-dimensional rather than flat. Each edge of this “3-D” shape should look like a reverse “L”.
Step 8
Add short segments at an angle in the corners. These short segments will finish off the outside points.
Step 9
Cleanup your drawing by erasing the points outside of the short segments drawn in the previous step.


