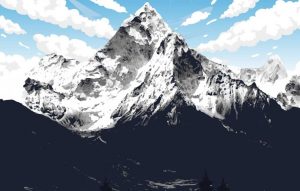
How To Draw Mount Everest easy with this how-to video and step-by-step drawing instructions. Learn to draw for beginners and everyone.
Please see the drawing tutorial in the video below
You can refer to the simple step-by-step drawing guide below
Step 1
At first, the idea of drawing a mountain as detailed as Mount Everest seems like a daunting task. But when we break it down into steps, it’s actually quite simple. Use a 2H or stiffer pencil to sketch some basic guides. First, let’s draw a horizontal line in the lower part of our page. This will be our horizon, and although we don’t really need it for the vanishing points, it would be nice to have it as a guide. Above the horizon, draw a triangular peak, protruding as a straight ledge along the right side of the page. Our illustration will be from the northern slope of the mountain.
Step 2
Now that our guides are in place, let’s draw the foreground terrain. It’s best to start on the ground and go to the top of the mountain. The foreground should be rocky and not snowy. We’ll have two shallow ramps sloping down in the middle of the page. The foreground terrain should not extend beyond the horizon.
Step 3
In addition to these shallow hills there should be more rocky terrain with small hills scattered everywhere. Again, make sure these hills don’t go over the horizon. These hills should not go all the way to the left of the page.
Step 4
Draw a high gradient on the left side of the page. It should be a fairly straight diagonal and fall down the hills we made in step 3. Draw a few diagonal lines on the side of the slope.
Step 5
Now that our foreground is complete, let’s start working on Mount Everest itself. The base of the mountain has a few shorter mountains that are smashed into its face. Draw the first mountain behind the edge of the slope that we drew in step 4. It should have a sharp peak and be in the shape of a triangle. The mountain is very rocky and jagged.
Step 6
Next, draw a few large snowbanks to the right of this small mountain. Between the two banks of round snow should be a patch of rocks.
Step 7
Above the snow bank will be another sharp mountain part. This particular section should be rocky with lots of short, vertical lines on the side. The peak should not extend past the mountain guide we made in step 1.
Step 8
Draw more cliffs and large rocks to the right of the snow bank. Notice how the right part of this mountain is cut out by a jagged line where the rock has broken up over time.
Step 9
At the foot of the mountain, there should be long slopes that gradually rise towards the snowy shore.
Step 10
Now we can draw the top of the mountain. Again, it needs to be very rocky and jagged. The top has a pointed tip in the middle of the page. It slopes down to the left, where it meets a vertical section of rock before sloping down more as it reaches the left side of the page. To the right of the top will be a gradually falling ledge ending just above the horizontal portion of our guide lines.
Step 11
The right side of the mountain descends and becomes a very subtle descending diagonal. It needs its fair share of the large rocks along the top.
Step 12
Now that the basic shape of the mountain has been drawn, go back to a sharpened pencil and draw cliffs, ledges, and rock patterns all over the ridge. Notice that the texture near the top of the peak is mostly made up of horizontal lines with a few vertical slopes, but there are more vertical lines as we go down the edges of the mountain. There should be vertical, jagged, vertical lines near the right side of the foothills.
Step 13
You should draw the edge of the snow line, because the snow does not go all the way to the ground. The edge of the snow will rise high on the left side of the page and low on the right. It is not a straight or solid line, but a squiggly line with separate patches of snow.
Step 14
Mount Everest has a very high altitude and is often surrounded by clouds. We don’t want to cover our drawing with clouds, so just draw a few small clouds floating below the top of the mountain. This will give the viewer a context of how tall the mountain is.
Step 15
Now it is a good idea to mark up our image. You can use India markers and ink, or Micron markers. Be the patients and make sure not to inadvertently ink any unnecessary instructions. Once the ink has dried, erase your pencil marks with a kneaded eraser.
Step 16
Let’s add a drop shadow to give the image more depth. Set up your light source, and in this case, it’s coming from the left side of the page. A dry brush is great for shading the neighboring mountains. A dry brush is when you dip the brush in ink then wipe off most of the ink so that the brush is almost dry. It creates amazing textures that are not possible any other way. If you can’t use a dry brush, just do your best to shade the right side of each slope and patch of rock.
Step 17
That’s pretty much it! If you need to make corrections, you can use white ink or opaque white paint. You can also use it to add highlights, or you can use it to add additional texture to the shaded areas by using the dry brush technique once again. And that’s how you draw the tallest mountain in the world, Mount Everest!

