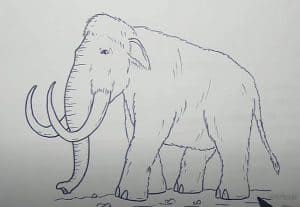
How to draw A Woolly Mammoth easy with this how-to video and step-by-step drawing instructions. Wild animals drawing for beginners and eveyone.

Please see the drawing tutorial in the video below
You can refer to the simple step-by-step drawing guide below
Step 1
As you can see, you will start this step by creating several circles that will connect to each other. Start with the head shape, then draw the upper body, and then the cone end. Finally, draw lines for the nose or torso.
Step 2
You’ll start this step by sketching the trunk first, then work your way up the trunk until you’ve drawn a dome-shaped forehead and head. Since mammoths have a lot of hair, you will need to outline some hair mainly on the top of the head.
Step 3
Now it’s time to outline the mammoth’s lower lip, then the full-sized furry cheeks and ears. These animals also have humps on their backs or necks so that’s the next thing to outline. Once done, sketch in the shape of the eyelashes hanging over the eyes, which you also have to draw and color.
Step 4
Woolly mammoths have long, curled tusks. Now you will proceed to withdraw those tusks and make sure that the tusks are pointed and thin.
Step 5
You are almost done with this lesson. Here you will need to outline the big forefoot and forefoot lines you see here. Notice that the legs also have their shoulders exposed. Draw the nails on the feet and move on to step six.
Step 6
Outline the backplate, and then draw in the rear end as well as the hind legs. As you can see, you will also need to draw the stomach and hind toenails.
Step 7
For the final step, all you do is draw the remaining hind legs, and then outline the long hair detail lines as you see here. Erase the shapes and paths you drew in step one to clean up the drawing.
Step 8
See how amazing your drawing is drawing a woolly mammoth. Now you can color it.


