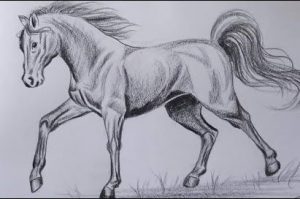
How To Draw A Realistic Horse with this how-to video and step-by-step drawing instructions. Pencil drawing tutorials for beginners and eveyone.

Please see the drawing tutorial in the video below
You can refer to the simple step-by-step drawing guide below
Step 1
Draw a large oval at a slight angle to form the horse’s torso. Then draw a second, longer oval to form the head – this oval should lie upright and also at a slight angle, as shown.
Step 2
Add curved indents to the oval representing the head. These indentations form a horse’s snout. Then connect the two ovals by drawing the outline of the neck. The top of the neck is slightly curved and connects the top of the head-oval to the body-oval. At the point where this line meets the body, it dips slightly, creating an indentation in the upper part of the oval. This creates a small valley in the back of the horse (where you would normally put the saddle). The lower part of the neck is just a straight line connecting the two ovals – but note that it joins the middle of the head oval and lies at an angle of 45-50 degrees downwards.
Step 3
Horses have large bulbous joints in their legs and it is important to pull them into place. The forelegs are mostly vertical with the large knee joints halfway down the shin and then the smaller ankle joints about two thirds from the bottom half of the leg. The hind legs are slightly curved and slightly thicker, especially towards the top.
Step 4
Toenails are slightly wider than feet and slope forward.
Step 5
Erase most of the guide lines of the head oval and torso oval, except for the lower part of the body. Add a curved line that separates from the base of the oval body and curls between the hind legs, parallel to the ponytail. This represents the belly. Next, add two ears. The ear on the far side faces outwards so we cannot see its inside, but we can see the inside of the ear closer towards us. Keep that in mind when we start casting shadows. Finally, add the horse’s left eye along the same vertical axis as the ear and in line with the bottom of the neck (SEE IN EQUIPMENT).
Step 6
Now we can start casting shadows. I like to do my drawings in segments and so we’ll start with the largest surface area – the body. Start by creating only a thin but even layer of shade all over the body. You don’t have to make it smooth, just make the tones even. I’ve also made the shadow areas (under the belly, under the neck, behind the hips) a little darker, but we’ll add the shadows properly in a few more steps.
Step 7
Here we smooth the shadow by dragging a cotton/paper towel over it. I like to use small circular movements and quick left-to-right movements with cotton pads/tissues to do so, but there isn’t really any special technique involved and it’s pretty easy to do. However, it is difficult to get an even tone in the shade and this can be attributed to two main factors. First, the base shader you’re smoothing may have an uneven tone – this will translate to an uneven tone in the smoothed shader. Second, the cotton/tissue pad may already be very dark and can smudge darker tones on lighter areas. You may want to periodically change out a new cotton pad/tissue to avoid this. To correct uneven tones, simply add a shading and smooth it in places that are too pale, or use a light eraser to lighten darker areas (and then smooth it again).
Step 8
Here we smooth the shadow by dragging a cotton/paper towel over it. I like to use small circular movements and quick left-to-right movements with cotton pads/tissues to do so, but there isn’t really any special technique involved and it’s pretty easy to do. However, it is difficult to get an even tone in the shade and this can be attributed to two main factors. First, the base shader you’re smoothing may have an uneven tone – this will translate to an uneven tone in the smoothed shader. Second, the cotton/tissue pad may already be very dark and can smudge darker tones on lighter areas. You may want to periodically change out a new cotton pad/tissue to avoid this. To correct uneven tones, simply add a shading and smooth it in places that are too pale, or use a light eraser to lighten darker areas (and then smooth it again).
Step 9
Here I have smoothed the shadow of the drop shadow. I also added some other shading layers and smoothed it out a lot to create the smooth shading bands seen here.
Step 10
Add some more shadows to the areas I did the same. It can be a bit difficult to add shadow layers on top of the base shadow layer, so I used a 4B (but LIGHTLY!) pencil to create the shadows. Also note the areas that I haven’t darkened just in front of the shoulders and around the hips – these will be used for highlighting later.
Step 11
Domesticated horses have a slightly glossy coat that creates distinctive highlights around their bodies. In this drawing, these highlights are mainly found on the shoulders and hips. The emphasis around the hip joint curves around the fold between the abdomen and hind legs. In this step, I’ve also started shading the bottom area of the horse’s shoulders. This area is very muscular with lots of weird protrusions and recesses, but it’s also quite dark in the final product so the details aren’t too important.
Step 12
This shows the rough shading of the shoulder area that you need to do before smoothing it out. Notice how it appears darker than the smoothed final product and also how there are more distinctive gaps between the shadow areas.
Step 13
Now smooth the shadow so that the different tones blend together. You may have to do multiple layers and keep working on this area until you get it right.
Step 14
Now we can start shading the legs. This is much easier than the body because the legs are very thin and do not have a large surface area. This makes it easy to make the shading consistent and smooth looking. Start by shading very dark on the horse’s right front and rear legs. These shadows should be drawn with 4B or darker and make sure you create layers of shadows instead of just applying more pressure as this can damage the paper. The rest of the pins have pretty simple shading, and you use the same technique to create a basic sketchy shading layer, which you then smooth and repeat. Paint a darker tone on the underside of the joint bulge and on the sides of the leg. Please also note that the front paws and the lower half of the hind legs are white and need a much lighter ball, which we will be doing in the following steps.
Step 15
Now add some detail around the leg joints. The important things to capture are the curved shadows around the undersides of the tubercles. Add some patches of shadow here and there along the legs. Then polish the hooves – you can make them pretty smooth or you can make them a little rough, that’s what I did. I also made the bottom half of the hind legs white (so in this graphite drawing they aren’t heavily shaded). I just painted a few veins and nicks on the leg which I will smooth out in the next step.
Step 16
Smooths shadows and details on the legs. Then we can finally start the face
Step 17
_ (1) _ Start by applying a base coat and then apply evenly with cotton/tissue paper (not shown) _ (2) _ Cover facial features like I did. Make sure you note that there are shadows around the cheeks and some darker patches around the eyes. _ (3) _ Smoothen the shading layer. You may have to apply multiple layers until you get the color you want. There’s a strip of white hair in the middle of the horse’s face, so it’s only a very light shade (unless you don’t want stripes). _ (4) _ Add the hair at the neck and the middle of the face. See the next step for a description of the technique I used to do this.
Step 18
_ (1) _ Start by creating jagged lines to form the ends of the hair _ (2) _ Now shade most of the hair _ (3) _ Smooth the shadows _ (4) _ Take a sharp 4B pencil (or darker) and draw shadows underneath the hair. _ (5) _ Smooths it and makes some hairs and gaps in the hair darker and sharper.
Step 19
Erase the shadow that falls outside the horse’s boundary using a piece of paper to cover the actual drawing as shown and then erase in the direction of the arrow. This allows you to remove excess shadows right up to the outline of the drawing. You may want to cut a curve on the paper mask to make this process easier.
Step 20
Finally, we start the last step of the drawing – the tail. _(1) _ Start by shading around the area. _ (2) _ Smoothing the ball. _ (3) _ Use a sharp (or darker) 4B pencil to draw details on the ends of the hair. I’m a little nervous and don’t show many intermediate steps here, but it’s actually pretty easy to do. Practice on a piece of scratch paper first if you’re not confident. Note that I left some hair at the tip of the tail light to give the tail some different tones – this isn’t strictly necessary, but I think it looks better. (4) You can’t really notice it in the picture, but just add a few lighter hairs with an HB or 2B pencil to the tail.
Step 21
That concludes this realistic pony drawing tutorial. I hope you found it helpful, if you have any questions, message me and I’ll try to get back to you. Thank you!


