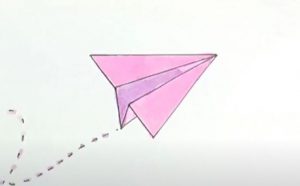
How to Draw a Paper Airplane easy with this how-to video and step-by-step drawing instructions. Easy drawing tutorial for beginners and kids.

Please see the drawing tutorial in the video below
You can refer to the simple step-by-step drawing guide below
Step 1
To make it easier to visualize the paper airplane, you can think of drawing a letter “V” horizontally or upside down.
Start by drawing the top of the plane. Draw a descending diagonal line across the top of your paper.
Drawing a paper airplane, or a real plane for that matter, relies heavily on straight lines. So feel free to use a ruler to help you draw straight lines quickly and easily!
Step 2 – Create a contour for the paper plane
Next, draw another diagonal line to complete the “V” shape as shown in the illustration.
Make sure it’s connected to the top end of the first diagonal we drew in the previous step.
Step 3 – Draw the Right Wing of the Paper Airplane
In this step we will draw the right wing of the paper plane.
Proceed by drawing a short downward diagonal line that connects to the end of the upper diagonal as shown in the illustration above.
At this point, the pointed end of the right wing of the paper plane is complete.
Step 4 – Finishing the Right Wing of the Paper Airplane
Draw a line starting from the bottom end of the diagonal we drew in the previous step all the way to the pointed edge of the V-shaped outline.
This completes the structure of the right wing of the paper plane.
Step 5 – Next, Draw the Left Wing of the Paper Airplane
Repeat the previous step on the opposite side to create the left wing of the paper airplane. This forms the side-by-side structure of the left wing.
Similar to the previous step, this line should join the pointed edge of the V-shaped border and should align with the bottom end of the left diagonal forming the left wing.
Step 6 – Then draw the folds of the Left Wing
Draw a short diagonal line starting from the endpoint of the diagonal we drew in the previous step.
This forms the folds of the left wing. This is also the part that we hold when we throw the paper airplane into the air.
Step 7 – Completing the Left Wing of the Paper Airplane
Draw a line connecting the two left wings of the paper plane. This completes the structure of the left wing.
At this point, both wings of the paper plane are complete.
Step 8 – Draw the Handle of the Paper Airplane
Draw an irregular V-shaped line just below both wings of the paper airplane. This forms the handle, an essential part of the paper plane to help it get into the air.
When drawn correctly, this line will connect all the ends of the paper plane, thus completing the structure of the entire paper plane.
Step 9 – Drawing the Flight Path of the Paper Airplane
Draw a dashed line consisting of multiple lines forming a curved line starting at the tail of the paper airplane.
This creates the illusion that the paper plane is flying, making it appear to be in mid-air.
You’ve got it — we’ve successfully drawn a paper airplane! Now, we have finally come to the most fun part, which is coloring the paper airplane!
Since the paper airplane is made of paper it can be any color you want! The color you will use for the paper airplane is completely up to you!
Feel free to use any color you like. You can even use multiple colors to create a multicolored paper airplane!
Have fun with colors and watch the paper airplane finally come to life!


