How To Draw A Gnome easy with this how-to video and step-by-step drawing instructions. Learn to draw for beginners and kids.
Please see the drawing tutorial in the video below
You can refer to the simple step-by-step drawing guide below
Step 1
We will create a classic depiction of a gnome in this tutorial on how to draw a gnome. In this first step, we’ll start with the contour of his head as well as the classic pointed gnome hat he’s wearing.
You can start by drawing a small round shape for his nose. Then we’ll draw two big circles on top of his nose. They will form the funny big glasses he is wearing.
Then you can use some curves to perfect the contours of his face. Finally, finish this step by drawing his tall hat sitting on top.
This will be so high that the tip will sag a little to the side. Then we can proceed to step 2 of the tutorial!
Step 2 – Now draw the details on his face and beard
With the first sketch of this gnome drawing complete, we can start adding some details on the face in this second step.
First, draw some small circles inside the glasses for his eyes, then add even smaller circles inside them for the pupils.
You can also add some details like his eyebrows and some lines around his eyes.
Then finish off his face by adding his mouth. To finish off this second step, we’ll draw a bushy beard underneath his face.
This will be drawn using some bumpy lines to make it look nice and bushy.
Step 3 – Draw his arms and chest
In this third step of the tutorial on how to draw a gnome, we will draw his arms and chest.
Use some more curves for his long sleeves, and then you can add a bit more sleeves at the end of each sleeve.
In keeping with the gardening theme, we’ll also draw a small gardening shovel on his hand on the left side.
Once you’ve finished his arms, we’ll then finish contouring his chest and waist before we move on to step 4 of the tutorial.
Step 4 – Next, draw his legs
We will finalize the outline for this gnome drawing in this step, and this will get you ready for the final details in the next section.
To do this we will draw his short legs. They will be drawn with some more curves and they will be so short that they are almost nonexistent.
You can then finish this step by drawing his round shoes at the bottom of his foot. To further emphasize the garden theme, we will draw a small flower on his shoe on the left.
Then we’ll be ready to add those last details we mentioned as we move on to step 5!
Step 5 – Add the final details to your gnome drawing
You completed all the outlines for this picture in the previous step of the gnome tutorial, and this step will see you add the final details.
In our reference image, we completed this small intestine by adding some smaller lines throughout the image. These lines will help add a bit of texture dimension to the image.
Once you’ve added these details, you can also keep the drawing going even further!
One way to do this is to add a background or you can even change the details to create a unique gnome!
If you’re feeling a bit ambitious, you could also paint some unique gnomes to stand around this one.
How do you think you will finish this gnome drawing?
Step 6 – Finish your gnome drawing in color
This is the final step of your gnome drawing, and in it we will finish him off with some colors!
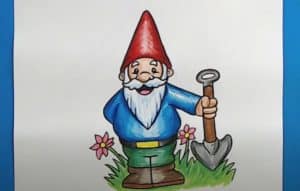
There are many different colors you can choose to finish him off and in our reference image we have shown you just one set of colors you can use.
We used yellow, green and brown for his clothes and then combined with some red for his pointy hat.
These are definitely colors you can use if you like this color scheme, but you should feel free to use any other colors you love as well!
When coloring this gnome we wanted to recommend some watercolor paints to give the painting a more classic, discreet look, but what colors and mediums can you think of to use for this image?
Your Gnome drawing is done!
Gardening gnomes are always a charming addition to any garden, and we hope you had a great time recreating this cute example of one in this tutorial on how to draw a gnome!
In this tutorial, we wanted to break this design down into smaller steps that not only make it easier for you, but also leave room for your own creativity.
Now that you’ve finished this design, you can add to it by adding a background, some other details, or even by designing your own variation of gnome! How would you complete this cute image?
Then you can continue to have fun drawing by finding your next drawing tutorial on our website. We have a lot of options for you to enjoy and we plan to release more soon.
Keep subscribing to never miss out!
We’d love to see your finished gnome drawing, so give it a shot by sharing it on our Facebook and Pinterest pages!
