How To Draw A Realistic Crow easy with this how-to video and step-by-step drawing instructions. Bird drawing for beginners and all.
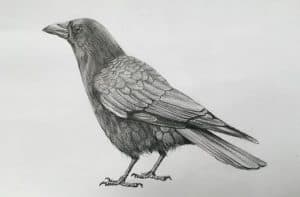
Please see the drawing tutorial in the video below
You can refer to the simple step-by-step drawing guide below
Step 1
Let’s start with this interesting shape first. Lightly sketch 2 oval and fan shapes for the tail. Draw legs and small hill for a tree stump.
Step 2
Draw the crow’s head, beak and feathers.
Step 3
Do you take time to draw in her chest and gorgeous wing feathers.
Step 4
Sketch the fluff on the chest, belly, legs, and stump. Keep a close eye on how they relate to the principles.
Step 5
Now draw its tail feathers. If you don’t have one, you can delete your rule.
Step 6
I made this line drawing especially for you if you don’t want to do the pencil shading and blending. If not, let’s continue with the pencil drawing.
Step 7
Here is a sketch done with a 0.7mm mechanical pencil. Look closely and see if your lines look like this. You can erase if some areas like eyes or nose don’t align. Observe how there are more details, such as dots. Be patient with this, it’s not as complicated as you think. As you make more images, this will come easier to you.
Step 8
You’re probably wondering how in the world I could get such a jet-black crow’s plumage. I helped with 9B Graphite Crayon (it’s a bit waxy) and it works great. Check out the size comparison with my other 9B Solid Pencil (which I call the Graphite Pencil). And look at the difference in their shade. If you want super-fast transitions to jet blacks and glosses, pick up that Graphite Colored Pencil at your nearest art store.
Step 9
CUBE, BALL, CONE, & CYLINDER – These are shapes that are everywhere in nature. It helps you know how to shade, add textures, and more. Recognize these shapes, simplifying the landscape or subject you are looking at. TONE, SHADING, SHADOW, & TEXTURE – Tone is the actual color, shadows are the part of the object away from light, shadows cast by objects and textures are rough, smooth, hilly, sharp, dense, etc. , the feeling or appearance of an object.
Step 10
Here are more exercises in case you want to practice to be more realistic. I also practice! And don’t worry about curves. It’s all part of the practice. In the next steps, you will shade with a pencil and learn more about crows and crows.
Step 11
My advice is to spend some time painting the shaded feathers. Start with the #2 pencil and make sure it’s sharp. Draw lighter colored feathers with short strokes. Darker hairs and shadow areas (throat, head, chest, belly and legs), draw with a 9B graphite pencil (if you don’t have one, use #2 pencil and continue to shade darker ).
Step 12
Sometimes my illustrator doesn’t cooperate with me so I need to improvise. I shaded under the wing and decided that it didn’t blend in with the picture. So I proceeded to use 9B Crayon to darken the tail and belly feathers.
Step 13
Continue sketching (with a #9B or #2 pencil with more pressure) in a diagonal, swiping direction. TIP: Make sure your pencil is sharpened. This technique creates the look of feathery prongs (or a feather-like look).
Step 14
It takes time or several layers to blacken the bird. When you mix with your stump, the graphite will cover more area… but that makes the overall coverage lighter.
Step 15
Adding more graphite to the shadows is a perfect solution. Sketch more contours for gentle darkening with the 9B Colored Pencils… check your reference so you don’t overdo this application. Now take your blend stump to smooth the lines and not darken the white areas. Also add some lines to the base of the tree the bird is sitting on.
Step 16
First, I sprayed the painting with “Krylon Workable Fixatif” to stick the pencils and pastels to the paper so the edges of the drawing weren’t smudged and the surface was workable. You can also give your bird a beautiful iridescent sheen in its plumage. Keep looking at the reference image and don’t be afraid of the dark. If the white areas on the feathers, such as under the wings near the tail, are not curled, use kneaded eraser or some opaque watercolor. Use an opaque white with a small paintbrush (size 1) for the right shape. The paper size I use is 8-1/2 x 11 inches (A4). I basically took a medium gray pastel and smoothed it in a circular motion to create a magical cloud in the sky. The remaining steps will show the difference between crow and crow.
Step 17
Click on this image to see the difference between Common Crow and American Crow. Also cut and paste these links into the address of your web browser to hear how different crows and crows sound.
Step 18
Click on this image to see the anatomy of a bird’s wings.
Step 19
Here is an interesting picture of feather anatomy. The wings of a feather extend from the tip to the barbed prongs. Bed bugs are the middle part of the hair that extends from the top to the bottom hollow shaft.
Step 20
These different types of feathers explain why a bird’s wings can look so different from its belly.
Step 21
Size Difference: The crow is the largest of the crows with a wingspan of 4 ft. Like the size of a hawk. The crow has a wingspan of 3 ft, about the size of a pigeon. Crows and crows also look different when flying. Crows have a tendency to soar through the air, and sometimes fly haphazardly. Their wings are longer and thinner, and the primary feathers – the main flight feathers on the wings – are also longer and have more space between them. The birds’ tails also look different when spread out; The crow’s tail curves evenly like a seashell, while the crow’s tail meets at a triangular point.
Step 22
Foraging and other things: Crows don’t mind loud, densely populated areas, as they like to collect seeds, fruits, and vegetables in groups. Crows are private, hunting only insects, fruit and undead, so they are more likely to be found in remote forests, grasslands and hills. Check it out… it’s a crow eating a dead baby shark!
Step 23
Without highlights, your painting will have a flat appearance. Click this image to learn how to make your own POP photo!
Step 24
Click on this image to see how Tone, Shade, Texture and Reflection affect the American Crow, a very intelligent animal! I am closing right now. But you’re all awesome and I’m happy to have worked with you on this tutorial. Like, comment and show your love here. And I will definitely reply back soon or last. Love, peace, happiness, success and better days come to you!
