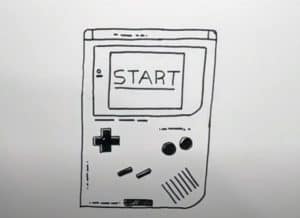
How to Draw a Gameboy Easy with this how-to video and step-by-step drawing instructions. Easy drawing tutorial for beginners and kids.

Please see the drawing tutorial in the video below
You can refer to the simple step-by-step drawing guide below
Step 1
First we will draw a parallelogram. If you want to draw a console in a straight position, you should draw a regular rectangle and go to the next step.
Step 2
Draw a small diamond inside the outline of the shape from the previous step. The rhombus should be at the top of the parallelogram. If you are drawing the game console in a straight position, you should draw a square instead of a diamond in this step.
Step 3
We draw the side of the dashboard body. Erase the lower right corner and instead draw a smooth, circle. Then, we draw a diamond around the small diamond from the previous step. Please note that one of the corners of the large diamond must also be rounded.
Step 4
If you’ve ever had this iconic game console in your hand, just remember how the buttons are located on Gameboy’s corpus. So we draw two circular buttons on the right side, a cross on the left, and two small buttons on the bottom. Don’t forget a few dots in place of the speaker.
Step 5
In this step, we will apply a light shader to the side of our game console. Draw a pair of diagonal lines on the screen. These details will make the console more realistic.
We just painted something very nice. This dashboard for many has become synonymous with the word “childhood”. We accidentally thought about the Gameboy console and decided to draw it. If you help us with interesting new ideas, our website will become better and more useful. We are waiting for you in the comments!


