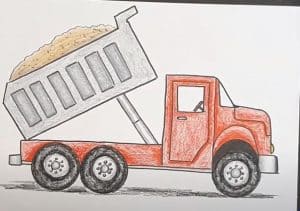
How To Draw A Dump Truck easy with this how-to video and step-by-step drawing instructions. Easy drawing tutorial for beginners and kids.

Please see the drawing tutorial in the video below
You can refer to the simple step-by-step drawing guide below
Step 1
The picture that we will draw in this how to draw a truck tutorial is going to be quite detailed and this can make it a scary picture!
This guide will break it down into smaller steps to make sure these details are easier for you and we’ll start with the truck front end.
There will be a few small, straight-edged windows at the edges of the section that we will design now. Then we will use some more lines to draw the edges of this section.
You will find this much easier if you have a ruler on hand! You can also draw some thin rail sections near this part, and then you can move on to step 2 of the tutorial.
Step 2 – Now draw the front of the truck
In the second part of your dump truck drawing, we will draw the front part of the dump truck. You can start this by drawing a rectangular section.
This will then have several smaller, thin sections inside of it. Then next to this we’ll draw some slanted shapes that will have some cubes on their bottoms.
Again, you’ll find it much easier to use a ruler for you.
Do your best to closely copy the lines as they appear in our example image and you’ll get the hang of it in no time!
Step 3 – Draw the next part and the first two wheels
These vehicles will often have to carry very large loads, and for this reason, they need large, strong wheels to help carry that load.
We will draw the first of these wheels in this step, but first we will add some more to the sides of the car in this step of the how to draw a truck tutorial.
This will also include another section. You can also add some horizontal lines to the thin gradient sections you drew in the previous step.
Then we will draw those wheels. They will have smooth rounded sections in the center, and then there will be some curves used for the rubber parts.
We will draw some angled grooves into the rubber parts to give them a better grip.
Then move on to step 4 of the tutorial!
Step 4 – Next, draw some more wheels and add the truck’s bed
We have some more important parts to add to your truck drawings. First, we’ll add another wheel.
This will go behind the front wheel you drew, and the tit will also be the same size. Then we will draw the plane of the truck.
This will be attached to a thin hydraulic post, and now we will draw the sides and striped base of the flat plate.
After they are drawn, we can finish this part in the next step of the tutorial and we will also take care of any final steps.
Step 5 – Add the final details to your truck drawing
Now you are ready to complete this picture before adding some color to the final step of this how to draw a truck tutorial!
The main thing that we will do in this step will be the rest of the flat sheet. This will be finished with some straighter and smoother lines.
There will also be a thin, flat section protruding from the end that goes near the top of the truck.
Once you’ve completed this section as it appears in our reference image, you’re ready for that final step!
Before proceeding, you can also add any additional details of your own that you might like.
One idea would be to draw a background showing what this truck might be transporting. What kind of setup are you thinking of for this truck?
Step 6 – Complete your truck drawing with color
Now you are ready to complete this dump truck painting with some color! These large vehicles are often brightly colored, as this makes them easier to spot on the road or on construction sites.
This is the approach we took in our example image, where we alternated yellow and black for the truck.
You can use the same colors for your own trucks, but you can also choose any other color you like!
How would you complete this wonderful painting with your colors?
Your dump truck drawing is done!
This medium often makes tough jobs a little easier, and in the same way, we hope that the how-to-draw tutorial made this drawing challenge even easier!
While this is a highly detailed image, by breaking it down into smaller steps we hope that it has been made easier and more enjoyable than you might expect.
Don’t forget to show your creativity by adding your own details, colors and ideas to complete it!
Then, when you’re ready for a new drawing challenge, you can find more drawing tutorials on our website. We regularly upload new tutorials, so keep checking to never miss out!


