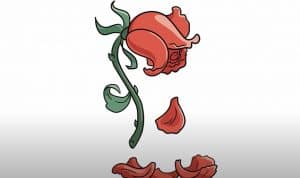
How To Draw A Dead Rose easy with this how-to video and step-by-step drawing instructions. Flower drawing tutorial for beginners and everyone.

Please see the drawing tutorial in the video below
You can refer to the simple step-by-step drawing guide below
Step 1
As we start with this withered rose tutorial, we’ll start with the petals of the flower.
To draw this part, we will use a lot of curves and circles to make it look wilted. It will also be angled so that the top of the rose hangs down and towards the floor.
As shown in our reference image, the top of the rose will also be quite round in shape and will be made up of a few small petals.
Then use some more curved lines with pointed edges for the leaf-shaped sepals at the base of the flower head. Finally, we will start drawing the stem of the dead rose.
Just use some straight but very curved lines for the start of the stem and then you’ll be ready for the second step.
Step 2 – Now draw the first leaves for the faded rose
Moving below the image, next we will start drawing some leaves for your faded rose drawing in this step.
The first leaf will be attached directly to the stem, and like the top of the rose, it will slightly curve down to show that the flower is dying.
The second leaf will be attached to a short stem, and this stem can be drawn with some simple curves attached to the main stem of the flower.
This leaf will also be drawn with some curved lines, but you’ll want to leave some space at the top where the other leaf will overlap it in a later step.
Step 3 – Next, draw more tree trunks
In this third step of the tutorial on how to draw a faded rose, we will add more contours to the stem.
Before you draw this outline, first draw another small, winding stem that leads from the main stem up to the base of the first leaf you drew.
You can then perfect the final outline of the main trunk by drawing some more straight lines that move downwards.
The base of the trunk will be at an angle to show where it’s cut, and there will also be an empty space on the left side where we’ll add some elements later.
Step 4 – Start drawing the final leaves
We will be filling in the space you left on the flower stalk in the last step of this faded rose drawing.
First, draw another thin stem using some more curved lines. Then there will be another leaf near this stem, and it will look quite thin due to its angle.
Again, there will be some space below this card, but we’ll take care of that when we add the final elements in the next step.
Step 5 – Add final touches to your faded rose drawing
Now you are ready for the final details and elements before moving on to the final step of this tutorial on how to draw a faded rose.
First, you can fill the last remaining space by adding another leaf, as shown in the reference image. Once we’ve finished drawing, we just need to add a few final details!
You can draw some veins on each leaf to make them look a little more realistic. Then add some more curves to the top of the rose to complete that aspect.
After all these details are drawn, you can also add some of your own! Can you think of any additional accents or background details to add?
Step 6 – Finish your dead rose drawing with some colors
You are now ready to complete this drawing of a dead rose by adding some color to it in this final step.
As you can see in our reference image, we used some pink and green for the flowers and stems, but we used some rather dark and muted tones of these colors. .
This is to further highlight that the flower is dead and wilted, and you can use similar colors for your own painting if you like the effect.
You can also change the colors if you want a different look for your own painting. Choosing your art medium is also a great way to get some color variation.
We’ll suggest several watercolor paints for this particular painting, but whatever you use will look amazing!


