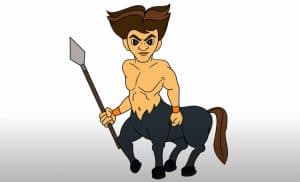
How to Draw A Centaur easy with this how-to video and step-by-step drawing instructions. How to draw cartoons for beginners and kids.

Please see the drawing tutorial in the video below
You can refer to the simple step-by-step drawing guide below
Step 1
In the first step of the how to draw centaurs tutorial, we’ll start with the creature’s head.
For his face, we’ll be using some curves for his eyes, nose, and mouth to give him an intense expression that shows he’s a business man!
We’ll also give him a bushy beard, and then you can also give him a bushy mohawk in the center of his head.
Finish by drawing his pointed ears, and then we can move on to the second step of the tutorial.
Step 2 – Draw his shoulders and chest
For the second part of this centaur drawing, we’ll be adding his shoulders and chest along with some armor he’s wearing on his chest.
You can start this armor off by drawing a circle on his chest and then adding some details to it.
Then draw four straps out of it. Two will go over his shoulder and two will go around his chest.
Finish this step using more curves for his shoulders and chest detail, and then we can move on to the next step!
Step 3 – Add some details of his hair and more armor
This third step of our how to draw centaur tutorial will start with some details on his hair.
Simply draw some slight curves to the sides of the hairstyle to add some texture detail to it.
We’ll then draw a large triangle for the base of his armor, and then you can add some detail to the inside of this shape.
You can then draw the sides of the belt and add some circles to it to create some large studs. Finish by drawing some line detail on the waist of his armor to close this third step.
Step 4 – Now draw his arms and more of his waist
We will perfect the human part of this centaur drawing in the next step.
First we’ll use some more curves for his muscular arms, and then we’ll add some jagged lines for the parts he has on his wrists.
His right arm will hold a long spear, and you might want to use a ruler to do that! We’ll also draw some more drops from the straps before we move on to step 5.
Step 5 – Draw the centaur’s front legs
As mentioned in the previous section of the tutorial on how to draw a centaur, we have completed the human aspects of this creature.
For this section we will focus on the front legs of the centaur. They look like horse legs and you can draw them using some slight curves.
Try to copy them exactly as they appear in the reference image to make sure they look a bit more realistic.
After these front pins are drawn, we will add the final details in the next section!
Step 6 – Now, add the last element of the centaur
Before you color your centaur, we’ll first add some details and final elements to complete it. You can draw the back of the pony part and add a wavy tail at the back.
Then finish by drawing both the hind legs of the pony part.
This pin will look slightly different from the previous one, so again you might want to try and closely duplicate it as it appears in the reference image.
Then you’re ready for the final step of the tutorial! Before you proceed, make sure to add any additional details of your own that you might like.
Background painting is a great way to take drawing to the next level! What kind of settings would you choose for this amazing centaur? We can’t wait to see!
Step 7 – Finish your centaur drawing with some color
Our final step on how to draw a centaur will be finishing it off with some color.
We kept most of the colors pretty muted in our reference image, with the main exception being on the armor, where we used some bright yellow.
However, the colors we used in the example are just an example of what colors you can use! For this step, you can really express your creativity with the colors you use.
You can also have a lot more fun experimenting with some new art media and tools, so let your creativity run wild and see what happens!
Your centaur drawing is done!
There are some tricky aspects to this centaurs drawing tutorial, so we hope that the steps we’ve given you make it easy and fun!
Even if a drawing is quite complex, it can be much easier when you break it down and follow the steps.
Now you can take it even further with your own ideas, details and additions!
Then you can find your next drawing challenge on our website. We have tons of great guides for you to enjoy there with more to come!


