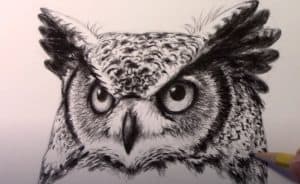
Owl Face Drawing easy with this how-to video and step-by-step drawing instructions. How to draw animals for beginners and everyone.
Please see the drawing tutorial in the video below
Here we see Step by Step Owl Face Drawing Tutorial. Owls are loved by children for their roles in various cartoons, books and movies (such as in the Harry Potter series). Some people fear owls because they are sometimes associated with bad luck. Owls are mainly seen at night on tree bark or in hollow spaces in trees, but in children’s imagination they can also be seen during the day. Owl images are mainly used in bookstores, magazines and classrooms. Do you know why?
Since the owl symbolizes reading, wisdom and drawing, I will make it so easy that anyone can do it, novice or expert. Drawing owl face is a good choice for those who like to draw birds. It is a great choice because it has room for details. Techniques such as different shadows and strokes are used to make it more realistic.
You can refer to the simple step-by-step drawing guide below
You don’t need to rush to bookstores to buy the material required to draw this easy owl face drawing because you have almost everything you need at your home.
- Lead pencil (HB, 2B, 6B, and 9B)
- Eraser (rectangular and big so that you can hold easily in hand)
- Sharpener
- Drawing sheet (texture should be smooth for a beginner)
Step 1. Eyebrows and Nose
Start drawing along the construction line for the body. Draw around the nose in the middle, then draw the eyebrows emerging from the nose. And Draw the eyes by finding the midpoint of the eyebrows. Draw a firm boundary of the eyes with a point (iris) in the middle of the white eyes and give a realistic look to the owl face drawing.
Step 2. Details of the ears and eyes
Then draw horns next to the eyebrows. Add a stroke for shading, and this technique will give a more natural look to the owl face drawing. Draw the hump on the beak of the owl face drawing.
Step 3. Feathers near the beak for a realistic look
Use the cross hatch method to draw feathers near the beak. Adding more feathers near the beak area will make it more visible and give a better look to the drawing.
Step 4. Define Body Shape
After drawing the feathers, now create a solid and defined shape for the owl’s body. A simple owl face drawing should have good shading and good contouring.
