How to Draw Cthulhu easy with this how-to video and step-by-step drawing instructions. Easy drawing tutorial for beginners and kids.

Please see the drawing tutorial in the video below
You can refer to the simple step-by-step drawing guide below
Step 1
Cthulhu has had many appearances in his various incarnations, but one thing that is generally quite consistent is that he has a squid-like face and head.
That’s what we’ll start with in the first step of the Cthulhu drawing tutorial. Use some circles to draw the curved edges of the center of his head to start.
There will also be a row of three empty eyes going up the sides of his head. Finally for this step you can use some wavy lines to extend the three tentacles that drop down from his head.
Now that’s all there is to do, so let’s continue to step 2.
Step 2 – Now draw some more of his head
The second step of your Cthulhu drawing will see you add some detail to Cthulhu’s face and head design.
First, draw some small, sharp spikes out of the outline of his head that you drew, then add some curved lines between them to create some contours.
Then add some thinner, more curved shapes from the top for some extra tentacles.
The more tentacles you can fit into the Cthulhu drawing, the better! Then we’re moving on to step 3 of the tutorial.
Step 3 – Draw the beginning of Cthulhu .’s body
Now that you have the head and tentacles done, we can start drawing the arms and body in this step of the how to draw Cthulhu tutorial.
In this design we have created a muscular figure for Cthulhu and you can draw his muscular arms using some curves for different parts of his thick arms.
Then use some curves for his abs and chest muscles, and then finish by drawing his hips. Once these aspects are done, we are ready for step 4.
Step 4 – Next, draw his legs
To continue drawing this Cthulhu, next we will draw his legs. Like his arms and body, his legs will be quite thick and muscular.
For them, the legs are also structured like an elephant. Use some more curves for his legs and try to position them so that the left leg is extended slightly forward.
We’ll also add some smaller line detailing to the interior of the leg contour for his knee details and other muscle structures.
His feet will also have some round, rough toenails that look a bit like the ones you usually see on elephant feet.
Step 5 – Add Final Details to Your Cthulhu Drawing
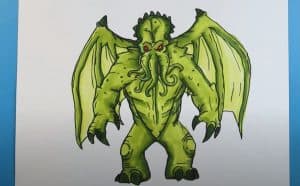
Another common element in Cthulhu designs is that he will have some large wings, and we will be adding some of these before the last step of the Cthulhu tutorial.
The wings in this design are a bit of a mix between a bat’s wing and the wing of an animal.
You can start them off using some curves for the skeletal structure of the wings. They will have a section at the top that has a claw poking out of them.
Then use some curves for the seams between the bony structures, and then add some line details to the membrane sections.
Once you’ve drawn these wings, you can also add some details of your own! It might be fun to paint the background and maybe you can show him he’s loitering over an unsuspecting city.
How will you finish your great drawing?
Step 6 – Finish your Cthulhu drawing in color
This is the final step of this Cthulhu drawing, and in it we will finish with some colors.
In our reference image, we’ve accentuated this monster’s aquatic nature by using several shades of green and blue for its body.
You can choose a similar color scheme for your own images, but you should also feel free to use any additional colors you might like!
This is your drawing, so you are really free with the colors you choose.
Once you know the color you want for it, make sure you have some fun experimenting with different art tools and media.
We can’t wait to see how you complete this image with your creative color choices!
Your Cthulhu drawing is done!
That’s the end of the tutorial on how to draw Cthulhu!
As we mentioned in the intro, he’s a pretty scary creatine, but we wanted to make sure this guide took the process by surprise.
We like to keep the drawing nice and detailed, and as long as you follow all the steps you should have no problem achieving all these amazing details.
You can then bring your own creative touches to the image as you complete the tutorial.
You can do this by creating a background or adding some details and choosing your own colors. Can you think of another way to complete the photo?
Be sure to visit our website when you finish this drawing, as we have some great drawing tutorials waiting for you there.


