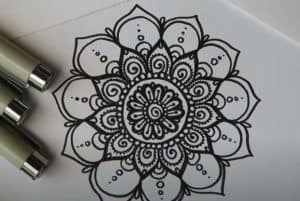
How to Draw A Mandala easy with this how-to video and step-by-step drawing instructions. How to draw step by step for beginners.

Please see the drawing tutorial in the video below
You can refer to the simple step-by-step drawing guide below
Step 1
When looking at a mandala, it seems that freehand drawing wouldn’t be possible.
This mandala drawing tutorial will show you that it’s not only possible but easy and fun when you know what to do!
After completing this tutorial, you can even use it as a base to design your own original mandala.
To begin with, you should draw a large circle. Drawing a perfect circle by hand can be very difficult, so using a tool like a drawing compass will be very helpful for this step.
Once you have the circle, use a pencil to draw a line down the vertical and horizontal axes of the circle to create the target shape.
We will use a pencil for these lines as they are there to guide you and won’t be in the final image.
Step 2 – Next, start drawing the pattern
Using the center of the cross you drew in the previous step, you can start drawing your mandala pattern.
To do this, draw some curves from the center of the mandala. This will create a teardrop-shaped circle that you can then draw small circles inside.
Step 3 – Now draw a circle around the center
If you used a drawing compass for step 1 of our mandala tutorial, it will be very helpful for this step.
Simply draw a small circle around the circumference of the teardrop shapes from the previous steps.
Step 4 – Draw another circle around the previous shape
Using that handy drawing compass, for this step of drawing the mandala you can simply draw another circle around the one in the previous step.
It is so easy!
Step 5 – Start drawing a pattern inside the circles
Inside the ring formed by your two circles, you can draw a pattern between them for this step of our tutorial on how to draw a mandala.
To do this, simply draw a triangle, jagged between the circles to form the pattern you can see in our reference image.
Step 6 – Next, draw an angled shape around the circles
You will need a ruler for this part of your mandala drawing. For this step, use your ruler to draw a hexagon around the two circles you drew earlier.
Then split the shape into segments before drawing a dot in each segment.
Step 7 – Draw the more complex parts of the pattern
Step 7 in our tutorial on how to draw a mandala looks a lot more complicated than it actually is! However, you may want to carefully refer to the reference image for this section.
You’ll draw some circles and corners around the hexagon from the previous step, then you can add some elements like a leaf shape before drawing lines out the edge of the mandala.
If you take it slow, follow the instructions and keep all sides symmetrical, you should have no problem with this part!
Step 8 – Finalize the final sample details
Before you move on to coloring your beautiful mandala, you can perfect the pattern in this step.
Like step 7, these template elements look more complicated than they really are.
To complete this drawing, simply draw some curved lines coming in from the edge of the mandala, and add some dot patterns for more depth. Again, keeping it symmetrical is key to this step.
Step 9 – Now finish your mandala with some colors
Completing this tutorial on how to draw a mandala is no small feat, and now you can easily do it with some coloring!
When coloring in a mandala, it is important that you express yourself using color. You should let yourself relax and choose whatever color feels natural to you in the moment.
Whether your colors are bright and bold or cooler and lighter, your finished painting will show how you feel! With this approach, no two mandalas are exactly alike.
There is a lot of space complexity in this mandala, so for that reason I would recommend a more precise color medium such as crayons, pencils, or fine-tipped brushes.
How will you finish your beautiful mandala drawing?


