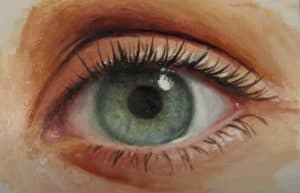
How to Paint a Realistic Eye with this how-to video and step-by-step painting instructions. Easy painting tutorial for beginners and everyone.

Please see the painting tutorial in the video below
You can refer to the simple step-by-step painting guide below
Step 1. Draw the eyes
I decided that it was easiest to draw my own eyes for this exercise, but if you want to look at someone else, feel free. I took a close-up photo of my eyes and printed it out for reference. However, if you want a challenge, skip the photo and just look straight in the mirror!
Using a pencil, I drew the outline of the eyeball, pupil, and iris, plus the eyebrows and lines below and above the eye. Don’t forget to include those details – they are defining features!
Step 2. Paint around the eyes
Before you start drawing the inside of the eye, paint around it. Mix the right skin tone (keep the color just right – not too light or too dark), and brush it all over your surface. Then, mix a shade and apply it to the crease above the eye. Then add highlights to the flap below the fold and blend it with the shadow.
Step 3. Gray eyes
You might think the eyeball is white, but it’s actually gray to us. It’s in the dark thanks to our lids, foreheads, and eye sockets. So it only makes sense for us to paint the eyeballs a light gray color! The centers will be brightest (think of spheres) while the tops and bottoms will be slightly in the dark.
Step 4. Paint the iris and pupil
This is the part where most people think of “eyes”. The iris can be a visually striking color, and depending on the light, the pupil can be large or small.
Create color block of iris and pupil with flat color, medium tone.
Iris details
Now darken the edges of the iris and just around the pupil. Notice how it has felt more realistic?
More iris details
If you look closely with your own eyes, I bet you will find a lot of fine details and varied colors. You can see tiny, radiating lines around your iris and that’s what we’ll be mimicking here. I used a darker blue pigment and created fine lines around. Then I added lighter colored wrinkles. Remember that when you draw these, don’t make straight lines. Since we are trying to represent a sphere, it makes sense to have paths following that shape.
Iris details
This is where you really want to look at your reference to capture the light correctly. Depending on your surroundings, your eyes may have different colored spots reflected on them. And, like in my picture, you can see that the edges of the pupil and iris have been distorted thanks to the highlights. Add highlights and bookmarks wherever you see them. This is what will make your painting look as realistic as possible. Don’t be afraid to add hints of yellow and red!
Step 5. Create graceful eyelashes
Everyone has a different length and number of eyelashes. Some people (like me) may be wearing eyeliner and mascara. Either way, you’ll want to use an eyeliner brush (if you have one) to draw in the lashes. Look closely at how the upper lashes are on the same arc. Starting with the edge of the eye, mimic the curvature and length of the lashes in one fluid motion. Move in and out of the eyes as they look shorter and less obvious.
The lower lashes will be shorter and thinner. Remember that there is a small area of skin between the eyeball and those eyelashes, so there will be space between the bottom of the eye and the eyelashes.
Draw eyelashes
Add highlights (thin, light colors) in between the lashes so they don’t look like an annoying mass.
Step 6. Finish touching
Once you’ve finished drawing the lashes, the hard part is over. Now you just have to go back and edit your painting. Take a quick glance at your references. What areas need to be blurred? Usually, it is the upper and lower part of the eyeball and the wrinkles around the eyes. If you have included eyebrows in the picture, now is the time to draw them.


